Alcove fitted furniture without a carpenter
Alcove fitted furniture without a carpenter: how much gap to leave, how to scribe a filler panel, a 132 × 248 cm example and a printable shopping list.
Autor: Amussim editorial team
Opublikowano:
Ostatnia aktualizacja:
27 min read
Blog › DIY › Alcove fitted furniture without a carpenter
Alcove fitted furniture usually brings to mind a carpenter who fits the pieces on site. Take an alcove that is 132 cm wide at the floor, 131.6 cm halfway up and 132.3 cm under the ceiling. Such differences are real, because plastering standards allow walls to lean out of plumb by a few millimetres. You do not need a carpenter to deal with them. You order a bookcase or wardrobe narrower by the installation gap, and you hide the gaps with filler panels and strips cut to fit the wall.
The concern is understandable: a ready-made piece of furniture in an alcove brings to mind a crooked gap along the wall. If you are wondering how to fit out an alcove without cutting boards on site, start with two questions: how much gap to leave and what to cover it with.
What we worked out in this guide. One example from measuring to filler panels: a 132 × 248 cm alcove and a Regał Linea bookcase of 130 × 36 × 240 cm. The result is a gap of 0.8–1.15 cm per side under a 35 mm strip, a top filler panel of 7.7–8.4 cm and a diagonal of 242.7 cm, which is 5 cm below the ceiling. You also get a comparison of conflicting gap recommendations with our conclusion, a "strip or filler panel" decision table, a calculation of shelf deflection, three drawings and a printable card.
What does alcove fitted furniture without a carpenter involve?
Alcove furniture without a carpenter is a piece ordered a few millimetres or centimetres smaller than the alcove, put in place, levelled and screwed to the wall, then framed with filler panels. You fit the filler panels to the curves of the walls and ceiling, not the furniture itself. The carcass can therefore be made in the workshop to the centimetre.
Filler panels, in Polish blendy or maskownice, are used in fitted furniture among other things to hide crooked walls and fill gaps (projektowaniezglowa.pl). The difference compared with carpenter-built furniture is who cuts the last millimetres. Here you do it, with a cordless screwdriver, a jigsaw and a pencil.
For an alcove for books, decorations or lever-arch files, the Regał Linea bookcase fits. You set the dimensions in the configurator to the nearest 1 cm: width 40–240 cm, height 60–260 cm, depth 25–45 cm (as of 15.09.2026). For clothes on hangers, choose the Szafa Kolumna wardrobe with a rail and shelves (width 60–240 cm, height 180–260 cm, depth 50–70 cm).
You will find the other pieces that you can set to the centimetre in the made-to-measure furniture section. If the alcove is in a narrow hallway, before you choose the depth of an alcove wardrobe check how much passage is left in a narrow hallway.
This method has its limits. It requires basic tools and patience when sanding. If you would rather not cut, you can choose delivery with assembly instead of a courier alone when you order. Check the scope of the service at checkout.
Before you measure the alcove: open the Regał Linea configurator and check whether your alcove dimensions fall within the ranges. The price updates live, so you immediately see the difference between one wide bookcase and two modules.
Bookcase, sliding-door wardrobe or plasterboard build?
This guide describes a piece of furniture with a carcass, for example a bookcase, set into an alcove and framed with filler panels. A built-in wardrobe with sliding doors is a different system: according to igameble.pl, the track system of a sliding wardrobe takes about 8–10 cm from the interior. Our calculation: if that much is lost from the depth, in the 38 cm deep alcove from the example, 28–30 cm is left for shelves.
A plasterboard build, in turn, is construction work, not furniture assembly. For building out an alcove "profiles and plasterboard, which are light and easy to work, are most often used" (nurtpol.pl). Shelves on brackets screwed to the alcove walls do not need a carcass, but they give you no back panel, plinth or closed wardrobe. If you need a clothes rail, see the Szafa Kolumna with a rail and shelves.
Fitting a bookcase into an alcove step by step
The whole job takes eight steps. The first four end with the order, and you do the next four after delivery.
- Measure the width and height in three places, the depth, the diagonals, the skirting boards and the sockets.
- Choose how to hide the gaps: overlay strips (a gap of 5–10 mm per side) or inset filler panels (at least 40 mm per side).
- Calculate the dimensions of the furniture from the formulas and check whether the diagonal of the side fits under the ceiling.
- Enter the dimensions in the configurator and order the furniture.
- Remove the skirting board within the outline of the alcove, or subtract its thickness from the depth of the furniture.
- Stand the furniture in place, level it and screw the modules together.
- Screw the furniture to the wall at the top panel.
- Cut the side, top and plinth filler panels to the walls and ceiling, then fix them.
What to measure in the alcove before ordering a bookcase
You measure the width in three places (bottom, middle, top), the height in three (left side, middle, right), the depth in two or three, and both diagonals. You take the smallest result from each series for the order, because the furniture has to pass through the narrowest point.
We devote a separate guide to measuring, so here is only the list of things without which you cannot work out the gap:
- width ×3 and height ×3, recorded to 1 mm;
- the diagonals of the alcove: the difference between them shows that the alcove is not a rectangle;
- wall curvature: hold a long spirit level or a straightedge against the wall and note the largest clearance;
- skirting boards on the back and side walls: thickness and height;
- sockets, switches, radiator, ventilation grille: distance from the floor and from the side wall.
How much gap to leave between the bookcase and the wall
In an alcove, the installation gap is 5–10 mm per side, that is 1–2 cm across the whole width, counted from the smallest measurement. That is what comes out of the comparison of the three guides below. With inset filler panels the gap grows by their width, and the height of the furniture is further limited by the diagonal when you raise it upright.
Where do these millimetres come from? The Polish standard PN-B-10110 for category III gypsum plaster allows a deviation from the vertical of up to 3 mm per 1 m. Over the full height of a room up to 3.5 m, the deviation can reach 6 mm. A right angle may deviate by 4 mm per 1 m of the arm (inspekcjadomu.pl).
Both walls of the alcove can lean inwards. Then the alcove under the ceiling can be narrower by as much as 12 mm (2 × 6 mm), although each wall on its own is within the standard. That is why a single width measurement is not enough.
Conflicting recommendations: 5–10 mm, 1–2 cm or 2–3 cm?
The guides give different numbers. For the width of an alcove, however, they describe the same allowance, only counted differently: per side or over the whole dimension.
| Source | What it states | What it applies to | Our reading |
|---|---|---|---|
| meble-stolmar.pl | "usually 5–10 mm at the sides and top" | installation gap of a made-to-measure wardrobe | 5–10 mm per side |
| meblewerso.pl | "a few millimetres of installation gap (about 1–2 cm across the width and height)" | alcove wardrobe | 1–2 cm over the whole dimension, that is 5–10 mm per side |
| igameble.pl | about 1–2 cm from the smallest dimension of the alcove; for a freestanding wardrobe at least 2–3 cm at the sides and about 5–10 cm above the wardrobe if it is raised upright | first range: alcove; second: freestanding wardrobe | for furniture in an alcove, the first range applies |
Our conclusion: for the width of furniture in an alcove, three sources give a consistent allowance. The larger values from igameble.pl apply to a freestanding wardrobe and to raising it upright. For furniture in an alcove, the same source gives 1–2 cm. For height the sources differ: 5–10 mm from the top or 1–2 cm. In the example below, the diagonal decides anyway and forces a larger allowance.
Strip or filler panel? A decision table
| If… | Then… | Basis |
|---|---|---|
| the gap at the narrowest point comes out at 5–10 mm per side | an overlay strip on the front edge of the side (variant A) | gap range from the table above |
| you want a clear frame like carpenter-built furniture | an inset filler panel, at least 40 mm per side (variant B) | narrower filler panels at the walls "will look less tidy" (projektowaniezglowa.pl) |
| the wall irregularities exceed 10 mm | drop the filler panel in the line of the carcass and scribe the filler panel in the plane of the front | 10 mm limit from projektowaniezglowa.pl; the choice of variant is our conclusion |
| the diagonal of the side exceeds the lowest ceiling height minus 1 cm | lower the furniture and cover the difference with a top filler panel | geometry, example below |
| a shelf would come out wider than 90 cm | split the bookcase into two modules | meblewerso.pl and the deflection calculation below |
| the alcove is under a slope or you do not know what the wall is made of | hire a fitter | the section on a professional below |
The diagonal when you raise it upright: check it before choosing the height
You stand a tall piece of furniture screwed together on the floor by rotating it on its bottom edge. During the turn it needs a space equal to the diagonal of the side: √(height² + depth²). If that diagonal exceeds the height of the room, the bookcase will jam against the ceiling halfway through the movement. igameble.pl also points to this "assembly diagonal".
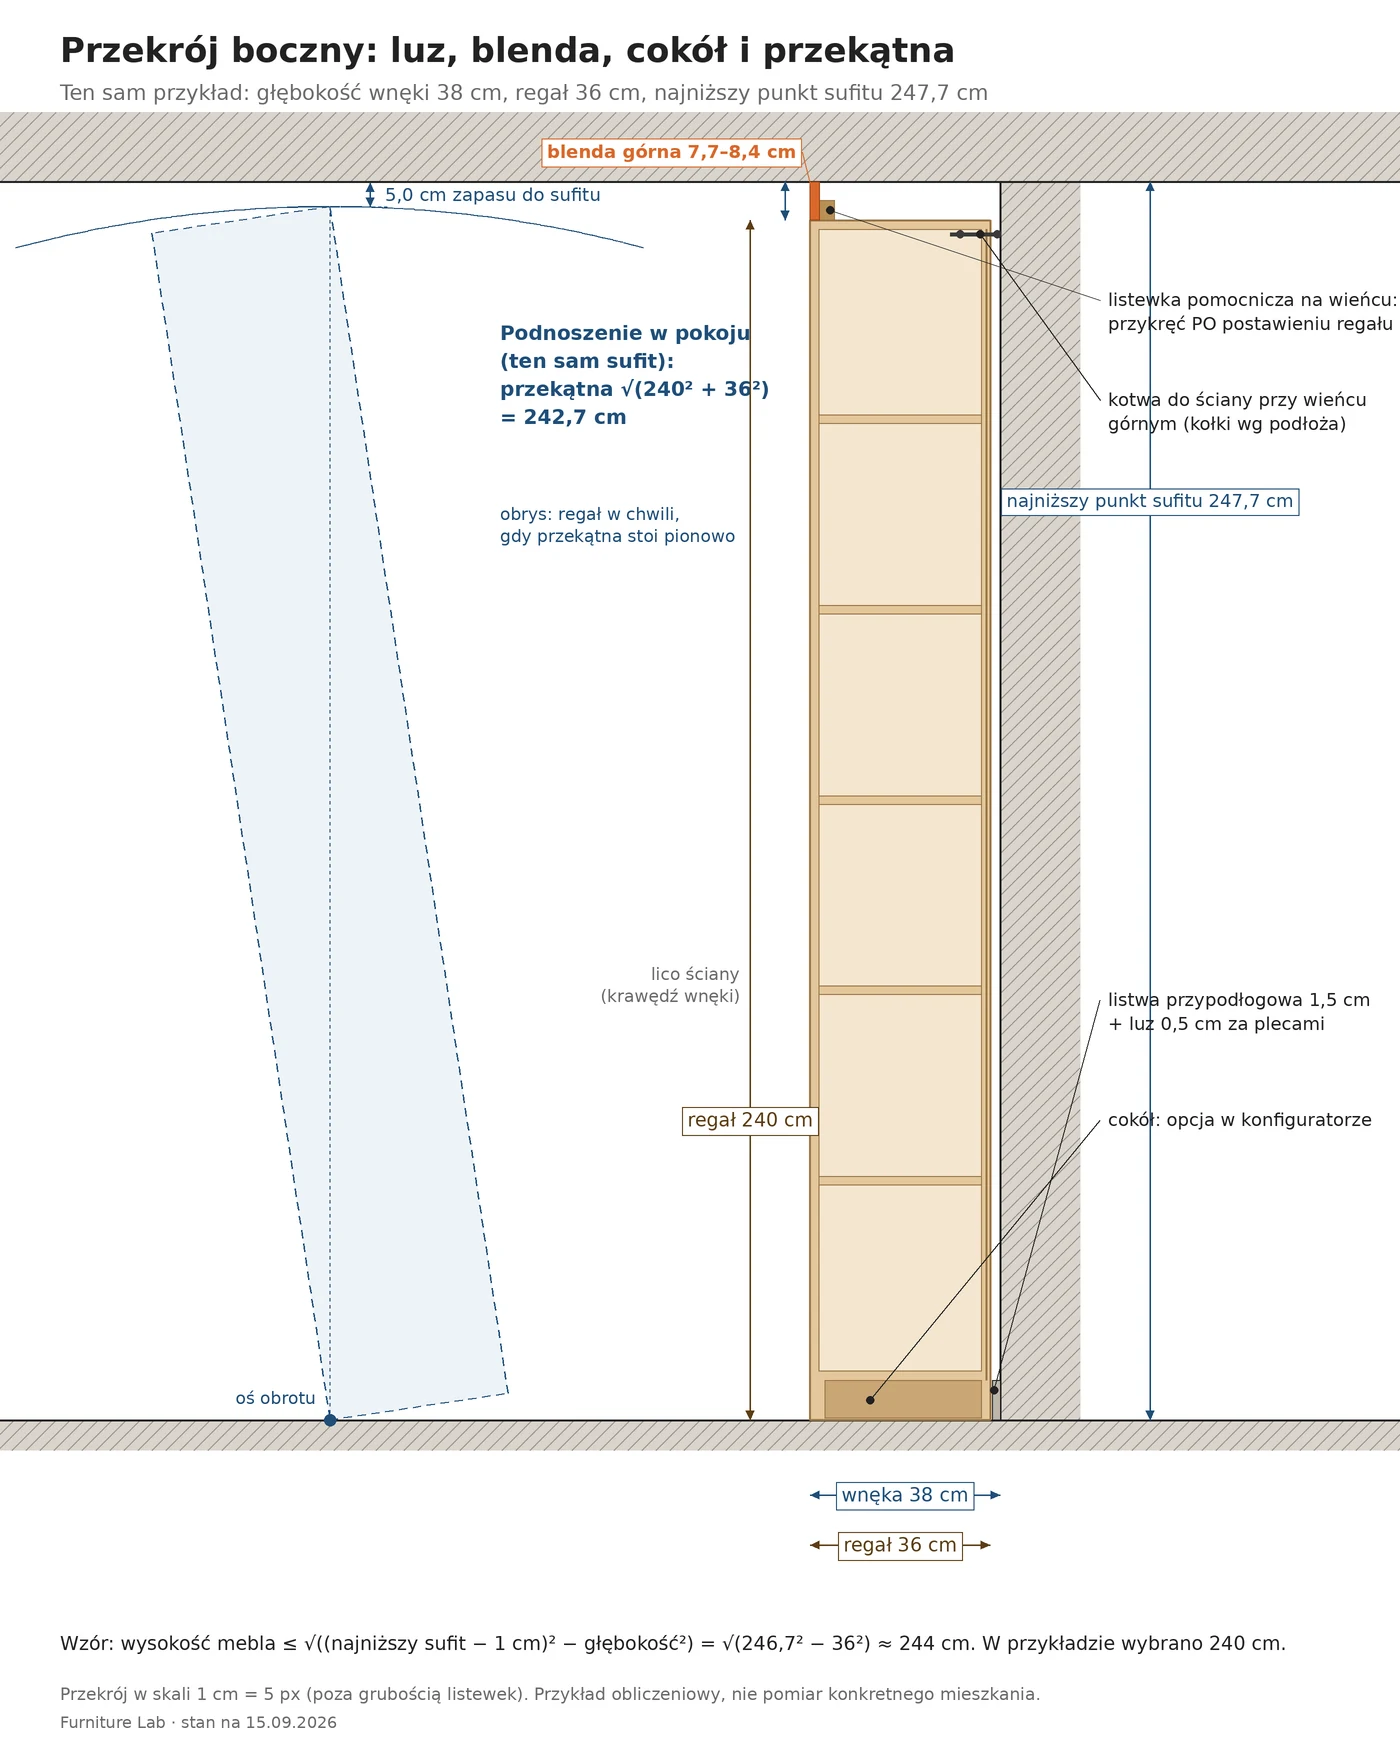
Fig. 1. Side section of the example: gap behind the back, top filler panel on an auxiliary batten, plinth, anchor and the diagonal when raised upright. SVG version
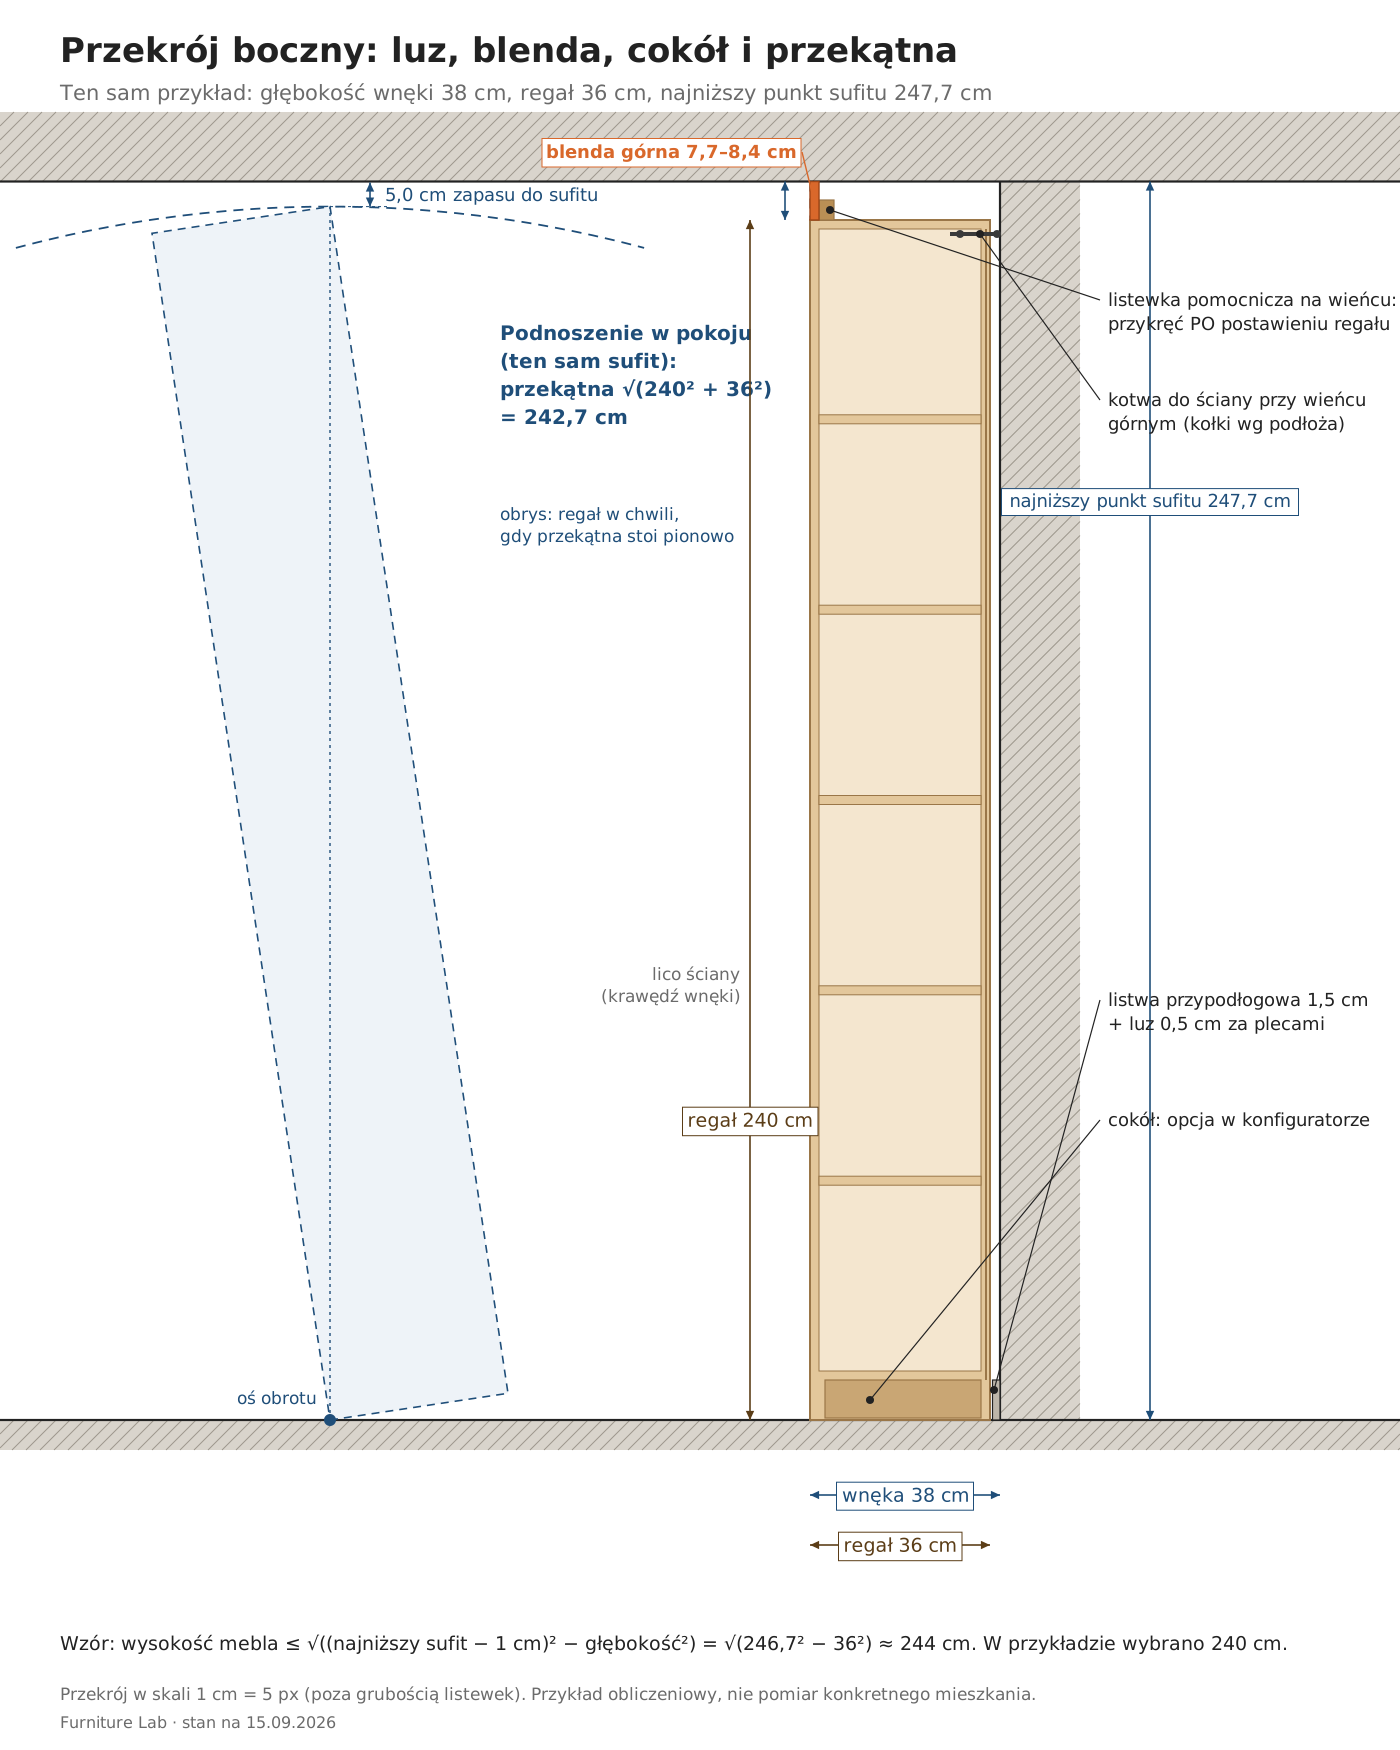
For tall furniture, this limit can be stricter than the gap. In the example below, the gap alone would allow a bookcase about 247 cm tall, while the diagonal, with 1 cm to spare, allows only 244 cm. The rule applies to any piece of furniture that you screw together on the floor or carry in lying down.
Example: a 132 × 248 cm alcove and a Regał Linea bookcase
Example measurements: width 132.0 / 131.6 / 132.3 cm and height 248.0 / 248.4 / 247.7 cm. The alcove is 38 cm deep, and the skirting board on the back wall is 1.5 cm thick. All numbers are a worked example, not a measurement of a particular flat.
| Parameter | Calculation | Result |
|---|---|---|
| Narrowest point | min(132.0; 131.6; 132.3) | 131.6 cm |
| Lowest point | min(248.0; 248.4; 247.7) | 247.7 cm |
| Bookcase depth | 38 − 1.5 (skirting board) − 0.5 (gap) | 36 cm |
| Bookcase height | diagonal √(240² + 36²) = 242.7 cm, which is 5 cm below the ceiling | 240 cm |
| Will 245 cm fit? | √(245² + 36²) = 247.6 cm against a ceiling of 247.7 cm | less than 1 mm to spare, not recommended |
| Variant A: bookcase width | 131.6 − 1.6 | 130 cm |
| Variant A: gap per side | (131.6…132.3 − 130) ÷ 2 | 0.8–1.15 cm |
| Variant B: bookcase width | 131.6 − 2 × 4.3 | 123 cm |
| Variant B: gap per side | (131.6…132.3 − 123) ÷ 2 | 4.3–4.65 cm |
| Top filler panel | (247.7…248.4) − 240 | 7.7–8.4 cm |
Variant A gives a narrower frame and almost the whole alcove width for shelves. Variant B looks like classic carpenter-built furniture with a clear filler panel, but the shelves in it are 7 cm shorter than in variant A. At a width of 123–130 cm, a shelf gets long. According to meblewerso.pl, an 18 mm board shelf wider than 90 cm "will certainly sag in time".
Our calculation: the deflection of a uniformly loaded shelf grows with the fourth power of the span. With the same board and the same load per metre, a 130 cm shelf will sag about 4.4 times more than a 90 cm shelf, because (130 ÷ 90)⁴ ≈ 4.35. A 65 cm shelf will sag 16 times less than a 130 cm shelf, because (130 ÷ 65)⁴ = 16. That is why two modules are better in this example, for instance 65 + 65 cm or 61 + 62 cm.
Formulas for fitting an alcove (copy them onto a sheet of paper)
- width of furniture = smallest width − 2 × gap per side (variant A: 5–10 mm, variant B: width of the filler panel)
- height of furniture ≤ √((smallest height − 1 cm allowance)² − depth of furniture²)
- depth of furniture = depth of alcove − thickness of skirting board − 0.5 cm
- top filler panel = height of alcove (smallest and largest) − height of furniture
- overlay strip = thickness of side + largest gap + 5 mm
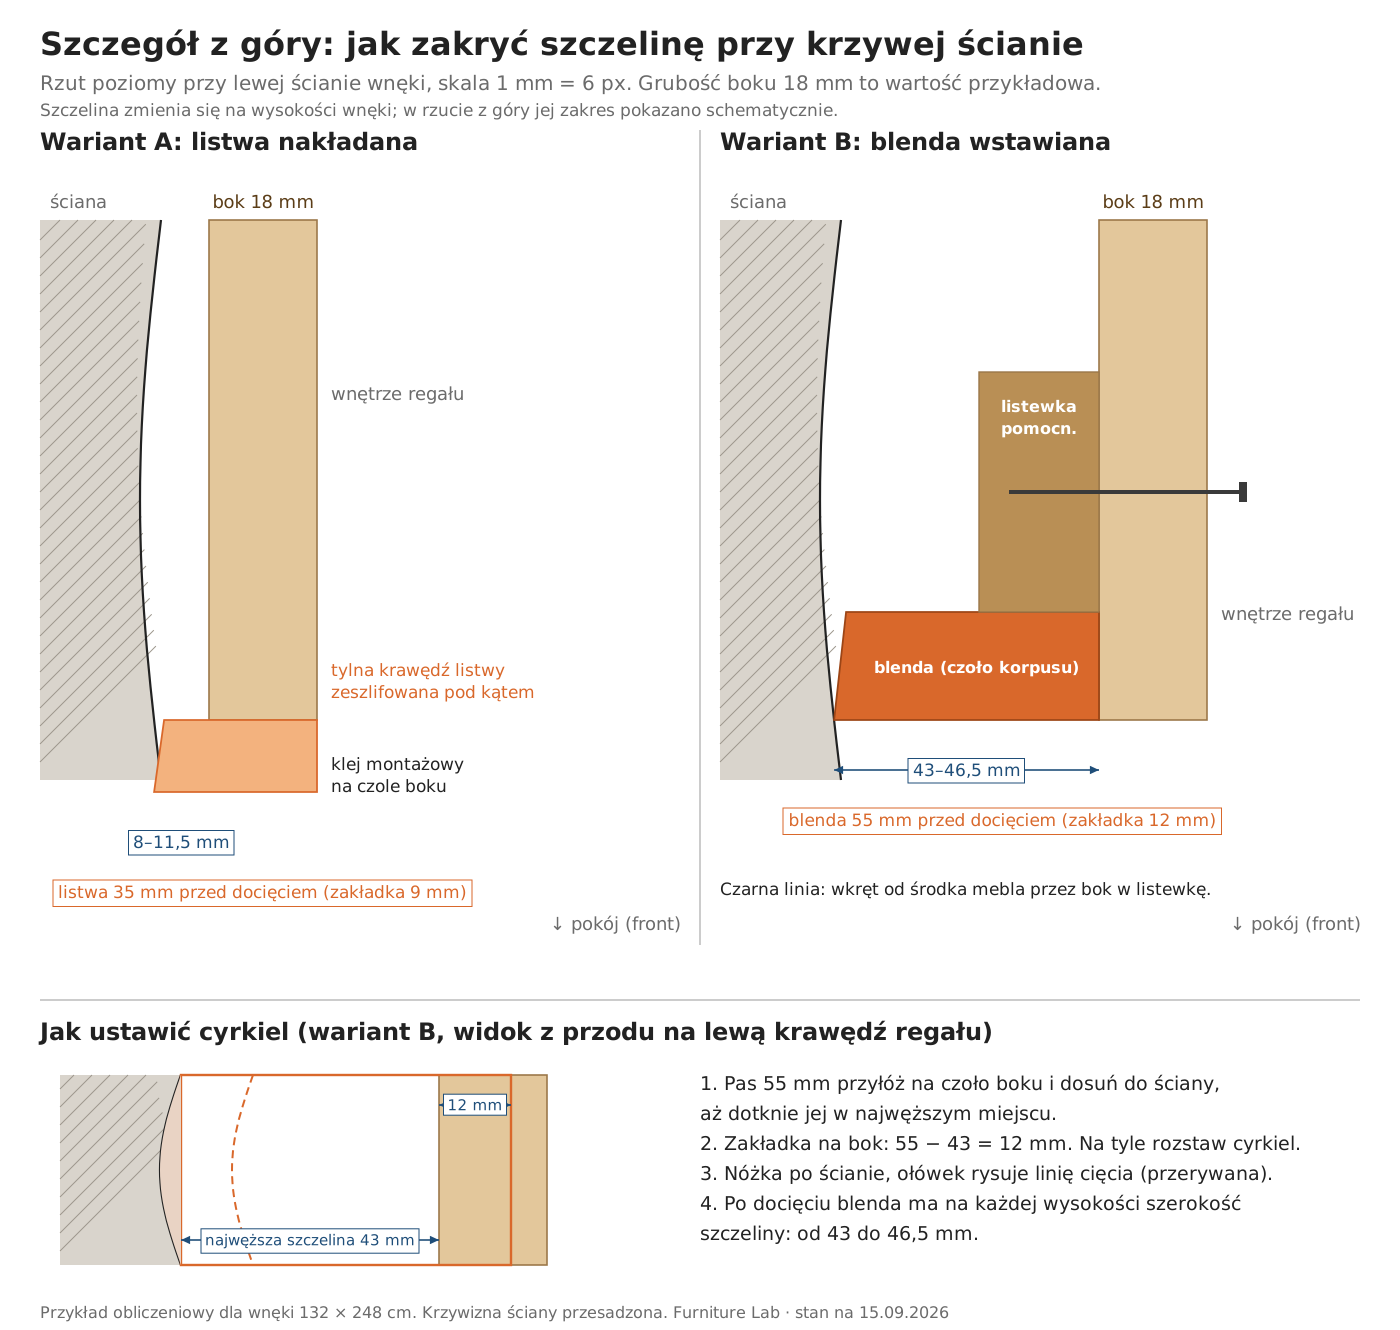
- compass setting = width of the strip − width to be covered at the narrowest point (variant A: 35 − (18 + 8) = 9 mm; variant B: 55 − 43 = 12 mm)
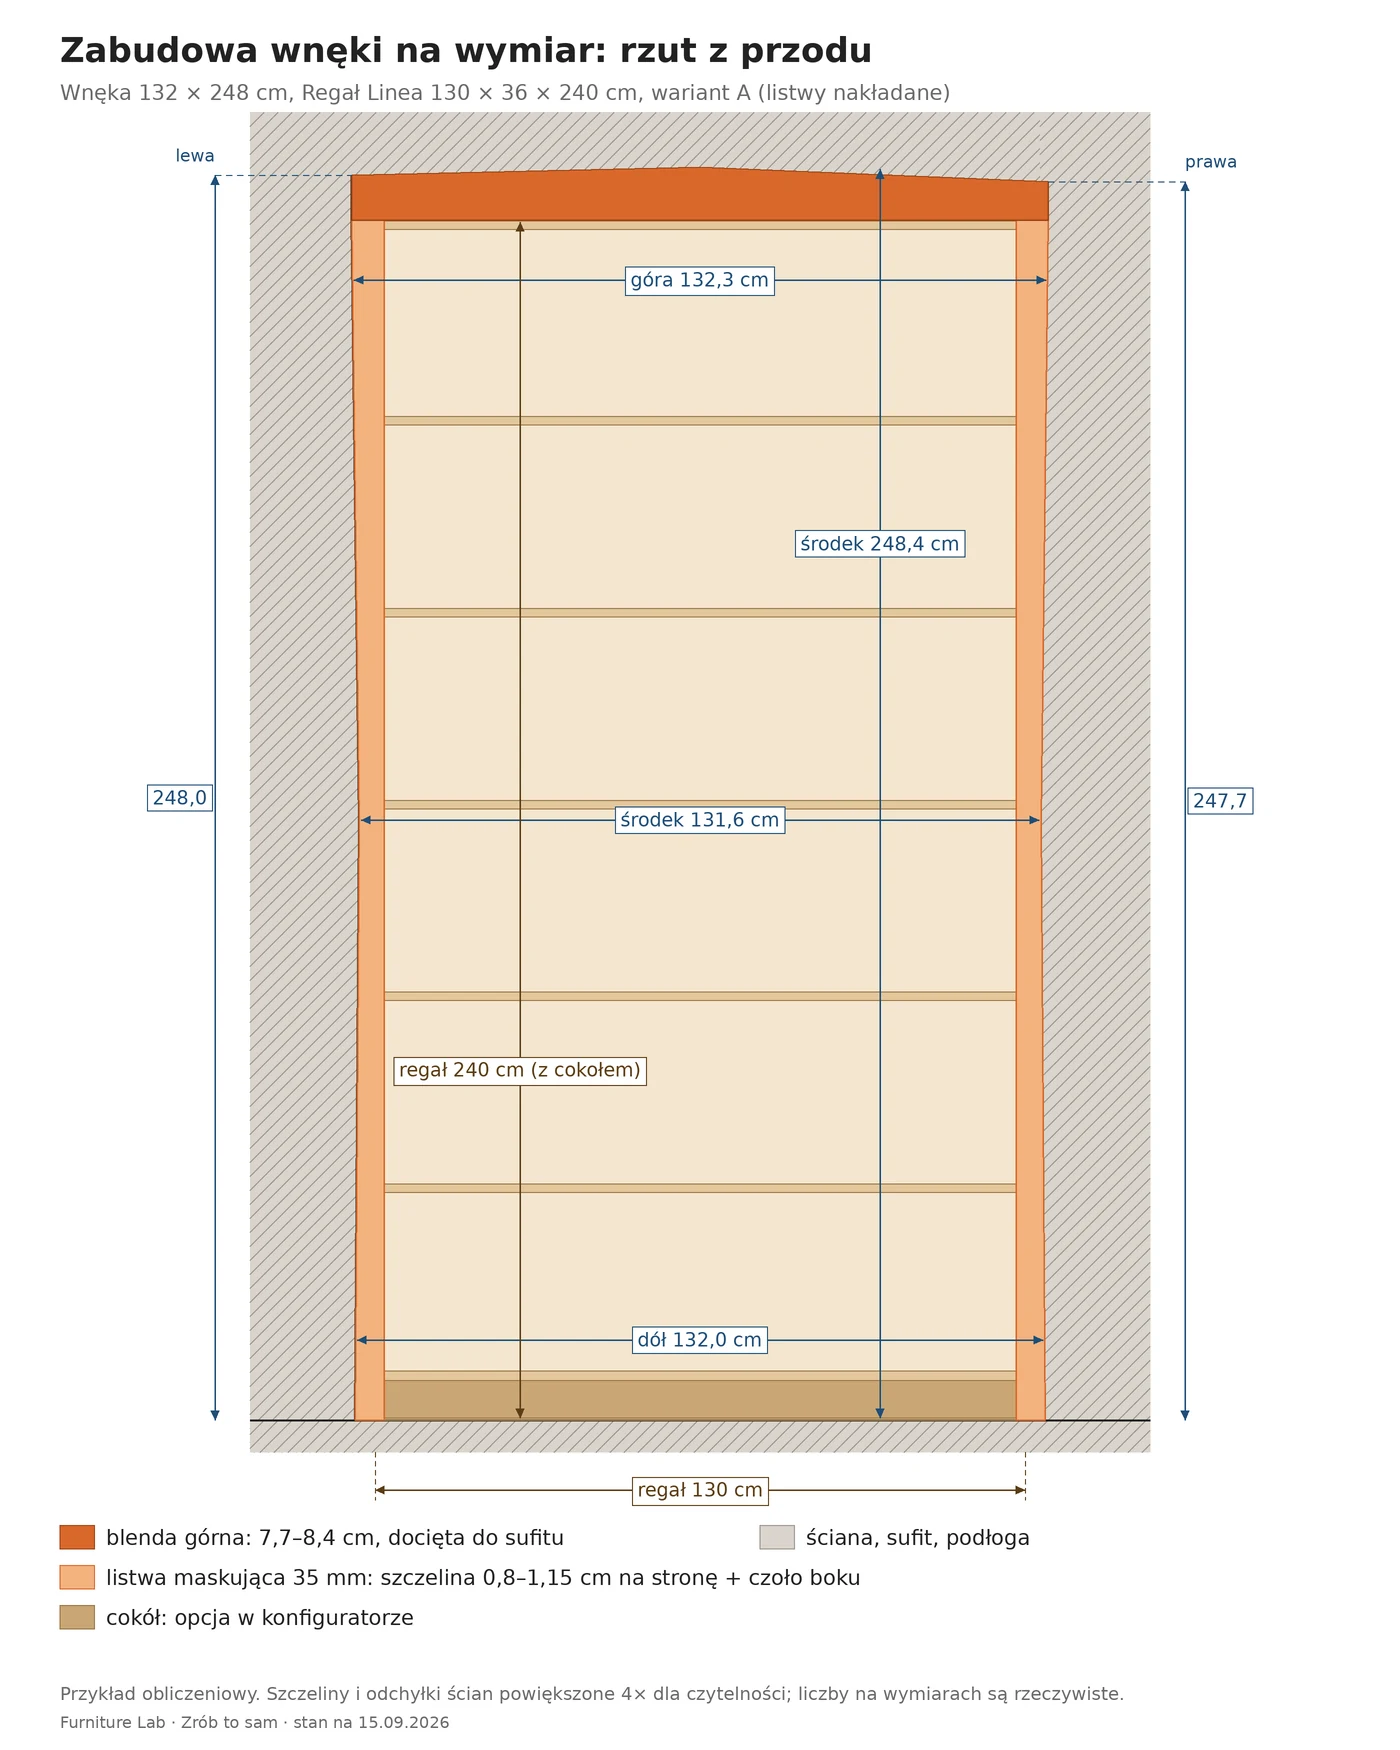
Fig. 2. Front view: three width and height measurements, the 130 × 240 cm bookcase, cover strips and the top filler panel. Gaps enlarged 4× for legibility. SVG version
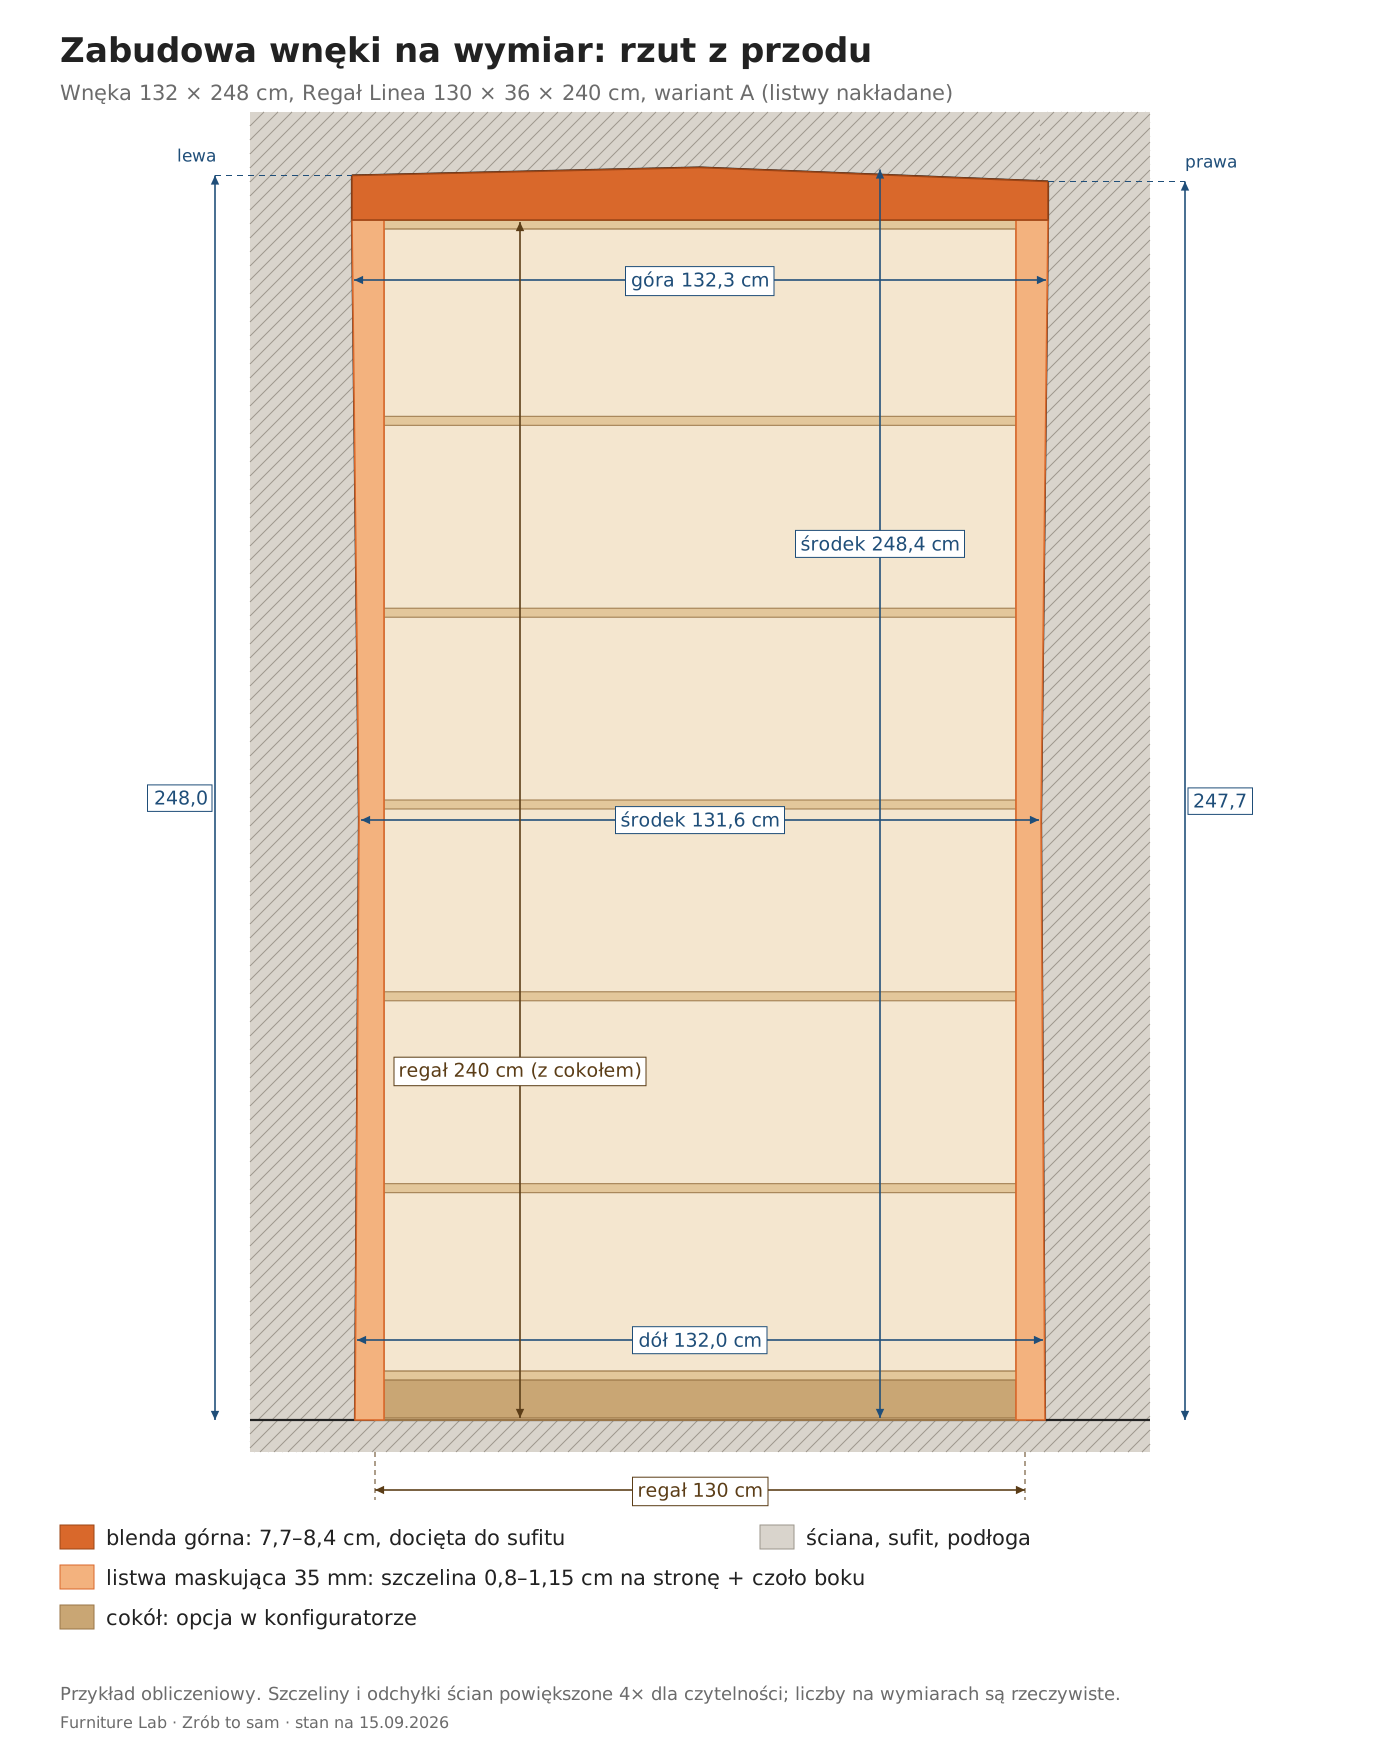
Work out your own alcove: enter 130 × 36 × 240 cm (or your own dimensions after subtracting the gap) in the Regał Linea configurator. You will see the price for that dimension before you buy a single strip. You will find more bookcase layouts on the page about a made-to-measure bookcase for books.
Filler panels and cover strips: what to hide the gaps with
A furniture filler panel, also called a cover panel, is a strip that finishes a built-in unit at the sides, bottom, top or in a corner. It is most often made from the front material and fitted in the plane of the fronts; filler panels in the line of the carcasses also exist (projektowaniezglowa.pl). In an alcove you screw it to the furniture and cut the edge facing the wall to the wall's shape.
A cover strip is a narrower strip laid over the front edge of the side. It covers the edge of the side and the gap at once, in our example up to 11.5 mm. Instead of a top filler panel you can use a ceiling trim, but it will hide only a gap smaller than its own height.
In a bookcase without doors, the plane of the fronts is the front edge of the carcass. The filler panel from variant B, flush with the front edge of the side, is therefore a cover panel finishing the unit at the wall, for which the source recommends at least 40 mm. The limit of 30 mm width and 10 mm irregularity applies to filler panels in the line of the carcasses, which in our reading means set back behind the plane of the fronts of cabinets with doors.
It is best to choose the filler panel in the same decor as the furniture.
If you buy strips yourself, for a laminated board in the decor Biały mat (Matt White) or Szary kaszmir (Grey Cashmere) you can paint a wooden strip with paint matched to the decor. For veneer (Dąb olejowany, Jesion bielony, Orzech amerykański: oiled oak, bleached ash, American walnut), look for a strip of the same wood species and finish it with oil. Buy the strips after the furniture is delivered and compare the colour in daylight by holding them against the side. How light changes the perception of colour is described in our text on comparing decor colour at home.
Side filler panel: scribing to a curved wall
Scribing means transferring the shape of the wall onto the edge of the filler panel with a compass or pencil, then cutting the material down to that line. The filler panel must be wider than the largest gap, otherwise there will be too little material left after cutting.
- Cut the filler panel to the height of the furniture. Take a width 5–10 mm greater than the largest gap (in variant B: 4.65 cm, so a 5.5 cm strip).
- Hold the strip against the front edge of the side and slide it towards the wall until it touches the wall at the narrowest point. The strip then overlaps the side. Fix it with clamps.
- Measure how far the strip overlaps the side: in the example 55 − 43 = 12 mm. Set the compass to exactly that, run the leg along the wall, and the pencil marks the cutting line on the strip.
- Cover the line with masking tape and cut with a jigsaw on the waste side, using a blade made for laminate.
- Remove the last millimetres with a plane or a block with sandpaper. Sand the back part of the edge at a slight angle so that only the front, visible edge touches the wall.
- Test the fit. After cutting, the filler panel has the width of the gap at every height, in the example from 43 to 46.5 mm. If it goes in tight with no clearance, glue or screw an auxiliary batten on from behind. Then screw the filler panel on from inside the furniture: the screw passes through the side and bites into the batten.
Choose screws so that they do not come through the face. The one that joins the batten to the filler panel must be shorter than the sum of their thicknesses. Before you start drilling the carcass or gluing strips, check the guarantee terms in the shop's terms and conditions.
In variant A (gap 0.8–1.15 cm), the overlay strip covers the front edge of the side and the gap at the same time. Its width is the thickness of the side + the largest gap + about 5 mm of overlap for cutting. With an 18 mm side (a sample value) that gives 18 + 11.5 + 5 = 34.5 mm, so a 35 mm strip. You cut it the same way as the filler panel; you set the compass to an overlap of 35 − (18 + 8) = 9 mm. You glue the strip to the front edge of the side with mounting adhesive that the adhesive manufacturer states is suitable for laminated boards, and hold it with clamps until it sets.
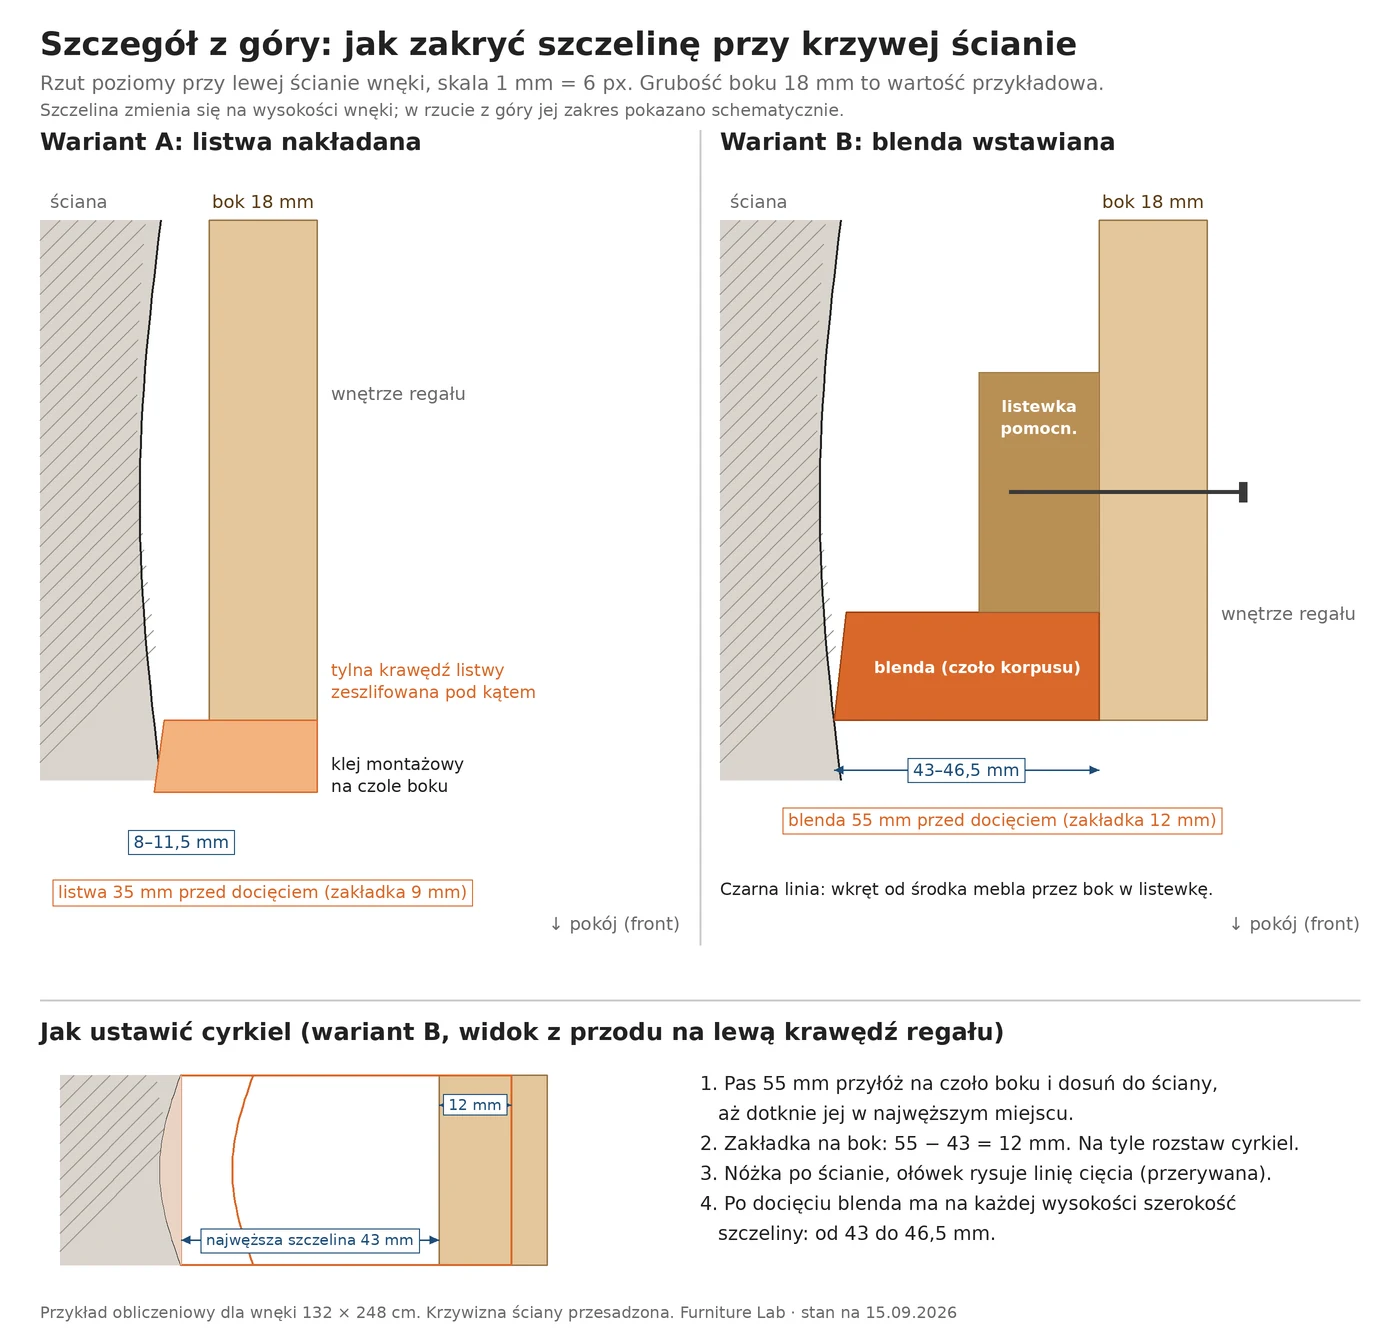
Fig. 3. Detail from above: overlay strip (A) and inset filler panel (B) at a curved wall, below the compass setting for a 12 mm overlap. SVG version
Top filler panel to the ceiling
In the example, the top filler panel is 7.7–8.4 cm, so you cut it from a strip of about 9 cm and scribe it to the ceiling with the same method as the side ones. You fix it to an auxiliary batten screwed to the top panel of the furniture, in the plane of the front.
Screw the batten on only after the bookcase is standing. Every centimetre at the top lengthens the diagonal and may block the raising.
Plinth and skirting board
The skirting board on the back wall moves the furniture away from the wall by its thickness. You have three options:
- remove the skirting board within the outline of the alcove, because the furniture will cover it anyway;
- leave it and subtract its thickness from the depth of the furniture, as in the example;
- cut the skirting board away only under the sides of the furniture.
The Regał Linea and Szafa Kolumna have a "Plinth" or "No plinth" option in the configurator (as of 15.09.2026).
On an uneven floor, level the furniture with shims under the sides, and cover the gap above the floor with a plinth filler panel cut in the same way as the side ones.
How to join the modules and screw the unit to the wall
Joining several bookcases into one unit
You screw two modules standing side by side together through the adjacent sides with connecting bolts with a sleeve. For example, the Hettich VHS set needs a 5 mm hole and comes in versions for material thicknesses of 28–36 mm and 36–44 mm (Hettich). When joining two sides, measure their combined thickness and check on the product page which version fits it.
- Stand both modules, level each separately and align the fronts.
- Clamp the sides so that there is no gap between them.
- Drill the holes through both sides at once, near the top panel, the bottom panel and at mid-height.
- Insert the sleeve from one side and the bolt from the other, and tighten without overtightening.
Two narrower modules are also easier to carry up the stairs and set up in a room. The diagonal when raised upright stays the same, though, because it depends on height and depth, not width. If the bookcases are to surround a television, we show ready-made bookcase layouts around a television with the Regał Linea and a TV unit in a separate article.
Anchoring to the wall: why the alcove is not enough
You also screw a bookcase in an alcove to the wall. The standard EN 14749:2016+A1:2022 covers domestic storage furniture. It has clause 5.5 "Floor standing units intended to be attached to the building", that is about freestanding units intended to be fixed to the building (free sample of the standard). According to the SATRA laboratory, tall furniture must either resist tipping over through its own construction or be fixed to the wall (SATRA).
The gap you leave at the sides means the alcove does not wedge the furniture. Filler panels hold on to the carcass, not the wall, so they will not stop the bookcase either when a child climbs a shelf. IKEA says it plainly: "we strongly recommend fixing furniture to the wall". This applies especially to chests of drawers, bookcases and tall wardrobes, and the plugs and screws must be matched to the type of wall (IKEA).
The scope of the standard excludes safety that depends on the structure of the building. Choosing a plug for plasterboard, brick or concrete is therefore your responsibility; the table of plugs for concrete, brick and plasterboard will help. Place the fixing points at the top panel: the higher the anchor, the longer the arm with which it counters tipping. If the pack contains no wall fixings, buy them together with plugs matched to the substrate.
Tools and shopping list
For fitting a bookcase into an alcove you need tools for measuring, cutting and drilling, plus a few small purchases. The first list is the tools, the second is the purchases that depend on variant A or B.
Tools
- tape measure or laser distance meter, a long spirit level or a straightedge;
- square, pencil, compass (or a block with a pencil taped to it);
- cordless screwdriver, a 5 mm drill bit for the connectors, masonry bits matched to the substrate;
- jigsaw with a laminate blade or a fine-toothed hand saw;
- plane, sander or a block with sandpaper;
- at least two clamps, masking tape, a stepladder.
Purchases
| Item | Variant A (strips) | Variant B (filler panels) |
|---|---|---|
| Side strips or filler panels | 2 × approx. 35 mm × height of furniture | 2 × approx. 55 mm × height of furniture |
| Top filler panel | 1 × approx. 90 mm × width of alcove | 1 × approx. 90 mm × width of alcove |
| Auxiliary battens | for the top filler panel | for the top and side filler panels |
| Carcass connectors | only with 2+ modules | only with 2+ modules |
| Wall fixings + plugs | yes | yes |
| Screws, mounting adhesive, levelling shims | yes | yes |
| Acrylic sealant in the wall colour for hairline gaps | optional | optional |
The dimensions in the table come from the 132 × 248 cm example; for your own alcove, substitute your own gaps.
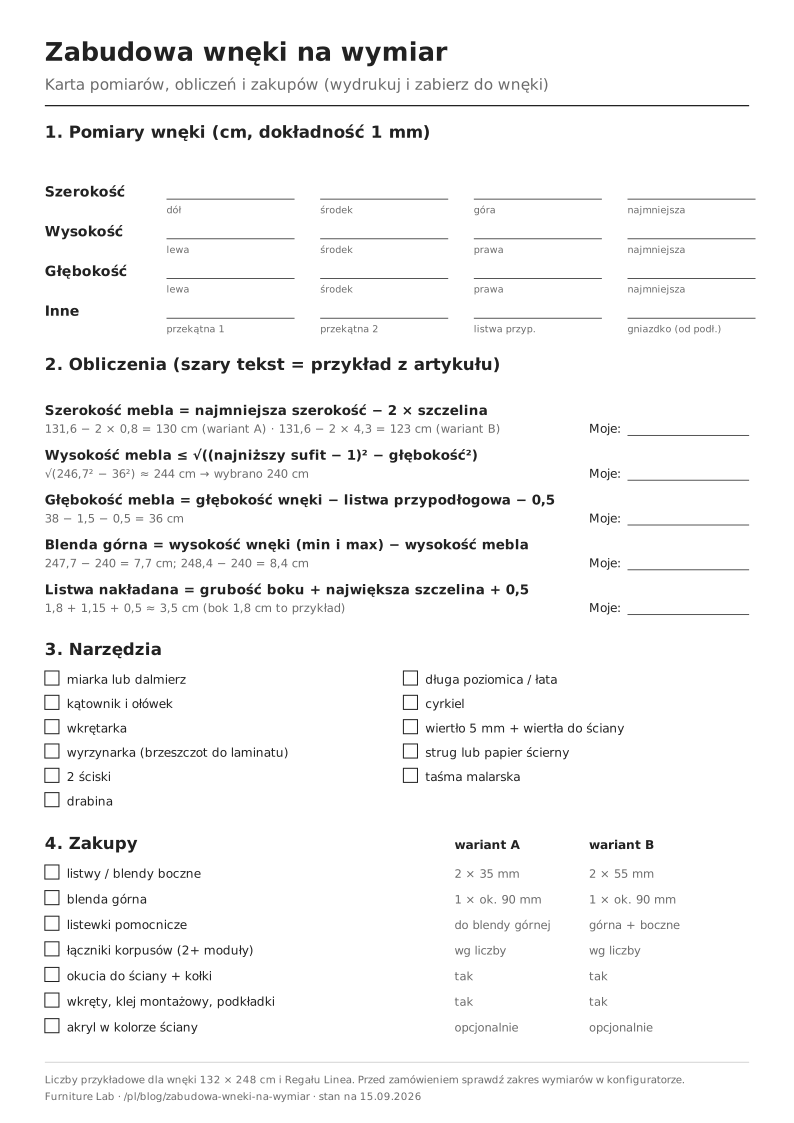
Printable card. We put the measurement fields, five formulas with a numerical example, and the list of tools and purchases on one A4 page: download the PDF card or the SVG version.
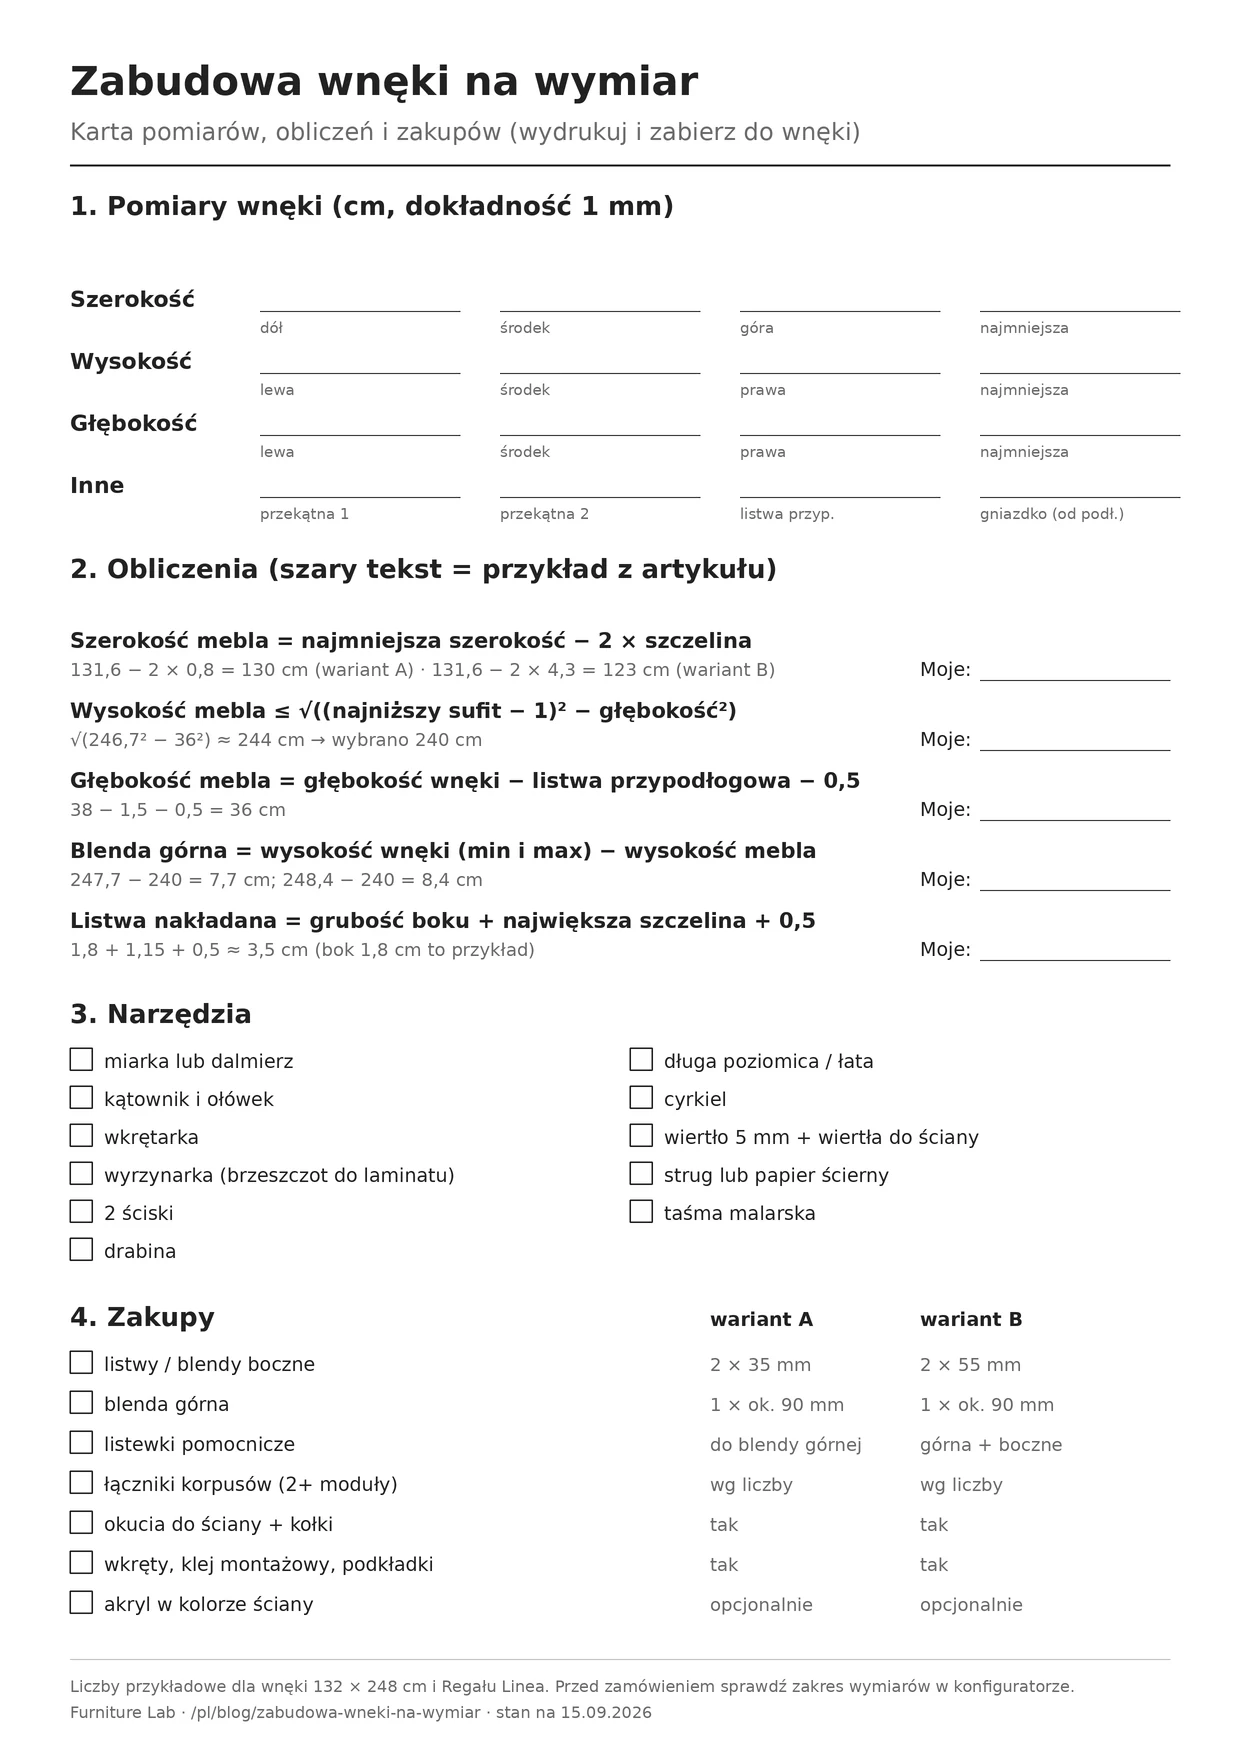
The most common mistakes when fitting a bookcase into an alcove
Seven mistakes on this list concern measuring, the order of work and fixing. Six of them come to light during assembly, the seventh only when someone climbs a shelf.
Ordering a dimension from a single width measurement. The alcove can be as much as 12 mm narrower under the ceiling than at the floor, although the walls are within the standard.
A height "right up to the ceiling" without calculating the diagonal. A 245 × 36 cm bookcase in an alcove 247.7 cm high will in theory go in, but in practice it will jam.
A filler panel narrower than the largest gap. After tracing the curve, there is nothing left to cut.
A skirting board left out of the calculation. The furniture stands away from the back wall, and the front sticks out past the face of the alcove.
A socket behind the furniture. If the bookcase has an HDF back, plan access to the socket before ordering.
Screws too long in the filler panel. The tip pierces the face, and the filler panel has to be replaced.
No anchoring "because the alcove holds it". With a gap at the sides, it does not.
When to choose a professional instead of fitting it yourself
Fitting it yourself is simplest when the irregularities in walls and ceiling are small. Filler panels in the line of the carcasses, at most 30 mm wide, can be used when irregularities do not exceed 10 mm (projektowaniezglowa.pl). With larger irregularities, in our view, you are left with a filler panel in the plane of the front, scribed from a wider strip.
Also call a professional if the alcove is under a slope or you do not know what to drive the anchors into. If you lack only tools and time, when ordering from Furniture Lab you can choose delivery with assembly instead of a courier; check the scope of the service at checkout.
FAQ: bookcase and filler panels in an alcove
How much gap should I leave when fitting a bookcase into an alcove?
With overlay strips, 5–10 mm per side, counted from the smallest of the three width measurements. With inset filler panels, the gap equals the width of the filler panel, usually at least 40 mm per side. Choose the height so that the diagonal of the side of the furniture fits under the ceiling.
What do you screw a furniture filler panel to?
To the furniture, not to the wall. You join the filler panel to an auxiliary batten, and you screw the batten on from inside the carcass through the side. You cut the edge facing the wall to the wall's shape, and you choose screws so that they do not come through the face.
Does a bookcase in an alcove have to be screwed to the wall?
Yes. The gap at the sides means the alcove does not wedge the furniture, and the filler panels are tied to the carcass. IKEA strongly recommends fixing bookcases and tall wardrobes to the wall, and you match the plugs to the substrate.
Bookcase or wardrobe for an alcove?
For books and decorations, a Regał Linea bookcase 25–45 cm deep is enough. For clothes on hangers, choose the Szafa Kolumna wardrobe with a rail, 50–70 cm deep. You can set both to the nearest 1 cm in the configurator.
How much does a made-to-measure alcove bookcase cost?
The Regał Linea has default dimensions of 120 × 35 × 200 cm, and the Szafa Kolumna 100 × 60 × 240 cm. The price also depends on the material and finish; the configurator shows it for your alcove. You add the strips, plugs and screws.
Can I stand the furniture in front of the skirting board?
You can, if you subtract the thickness of the skirting board from the depth of the furniture. It is simpler to remove the skirting board within the outline of the alcove, because the furniture will cover it anyway. A plinth filler panel will cover the gap above the floor.
Summary
Alcove fitted furniture without a carpenter comes down to three numbers. The first is the smallest width of the three measurements, the second is the gap chosen for the filler panels or strips, and the third is the diagonal that fits under the ceiling. The filler panels cut to the walls and an anchor at the top panel take care of the rest.
Enter your dimensions in the configurator and order a made-to-measure wardrobe or a made-to-measure bookcase for books. Production takes up to 10 working days, courier delivery is free throughout Poland, and the furniture has a 24-month guarantee. We show four layouts of furniture for a 25–30 m² flat in a separate article.
How we prepared this article. We checked the sources listed below on 15 and 16 September 2026. We read the dimension ranges of the Regał Linea and Szafa Kolumna and the plinth option from the shop's configurator on 15 September 2026; the note "as of 15.09.2026" refers to that day. The 132 × 248 cm example is a worked one: we assumed the measurements to show the method, and the results in the tables, on the drawings and on the printable card follow from the formulas given. We prepared the drawings for this article. The text does not describe tests or customer projects. If you spot a mistake, write to us through the contact form.
Sources
- Projektowanie z głową, "Blendy w zabudowach meblowych" (filler panels in fitted furniture): https://projektowaniezglowa.pl/blendy-w-zabudowach-meblowych
- Inspekcja Domu, "Odbiór mieszkania – normy i odchyłki" (handover of a flat: standards and tolerances; PN-B-10110): https://www.inspekcjadomu.pl/porady/odbior-mieszkania-normy-i-odchylki/
- Meble Stolmar, "Jak zrobić szafę na wymiar" (how to make a made-to-measure wardrobe): https://meble-stolmar.pl/jak-zrobic-szafe-na-wymiar/
- nurtpol.pl, "Jak zabudować wnękę" (how to build out an alcove): https://nurtpol.pl/jak-zabudowac-wneke/
- meblewerso.pl, guide to fitting out an alcove wardrobe: https://meblewerso.pl/jak-zabudowac-szafe-wnekowa/
- igameble.pl, "Jak zmierzyć miejsce na szafę" (how to measure the space for a wardrobe): https://igameble.pl/jak-zmierzyc-miejsce-na-szafe/
- Hettich, VHS connecting bolt and sleeve set: https://shop.hettich.com/pl_PL/-/Zestaw---%C5%9Bruba-%C5%82%C4%85cz%C4%85ca-i-tuleja-%C5%82%C4%85cz%C4%85ca-VHS/bp/variant280821888171
- SATRA, "The testing of storage furniture" (EN 14749:2016+A1:2022): https://www.satra.com/spotlight/article.php?id=544
- EN 14749:2016+A1:2022, free sample (SIST, iTeh Standards): https://cdn.standards.iteh.ai/samples/75722/009f5331f6e74dc9a49466cd707e8b2f/SIST-EN-14749-2016-A1-2022.pdf
- IKEA Poland, "Czy muszę montować meble do ściany?" (do I have to fix furniture to the wall?): https://www.ikea.com/pl/pl/customer-service/knowledge/articles/7051e4g1-f5c9-4230-8fcc-8c49g86g4913.html
Furniture for your wall, to the centimetre
See what you can design to measure, or go to the recommended page.
Read next
 Do it yourself
How to hang a wall cabinet on any wall type
How to hang a wall cabinet on plasterboard, hollow block or concrete? Check the wall plug load capacity in fischer tables, work out the load and fit it.
34 min read
 Furniture care
How to clean laminate and veneer furniture
How to clean laminate and veneer furniture? A YES/NO table for 12 household products, based on EGGER, Kronospan and oil makers. Check before you wash a front.
23 min read
 Advice
How to choose furniture colour: sample test
How to choose furniture colour when a screen and a bulb alter a decor's shade? Test a sample at home in 9 steps: light, floor, upright and flat. PDF checklist.
27 min read