How to hang a wall cabinet on any wall type
How to hang a wall cabinet on plasterboard, hollow block or concrete? Check the wall plug load capacity in fischer tables, work out the load and fit it.
Autor: Amussim editorial team
Opublikowano:
Ostatnia aktualizacja:
34 min read

Before you decide how to hang a wall cabinet, check what it will hang on: a cabinet holds on to the wall only as firmly as its weakest wall plug. The same fischer DuoPower 8×40 plug has a recommended load of 1.10 kN (about 112 kg) in concrete, but only 0.15 kN, about 15 kg, in 12.5 mm plasterboard. That is what the manufacturer's load table says.
If a plug has ever spun in its hole for you, you know the problem from experience. This guide shows how to fix a kitchen cabinet, a TV unit or a shelving unit using the manufacturer's figures, not whatever was in the bag. First you identify the wall. Then you choose a plug from the table, work out the load, check where cables may run and follow the fitting steps.
How to hang a wall cabinet: fixing selection diagram
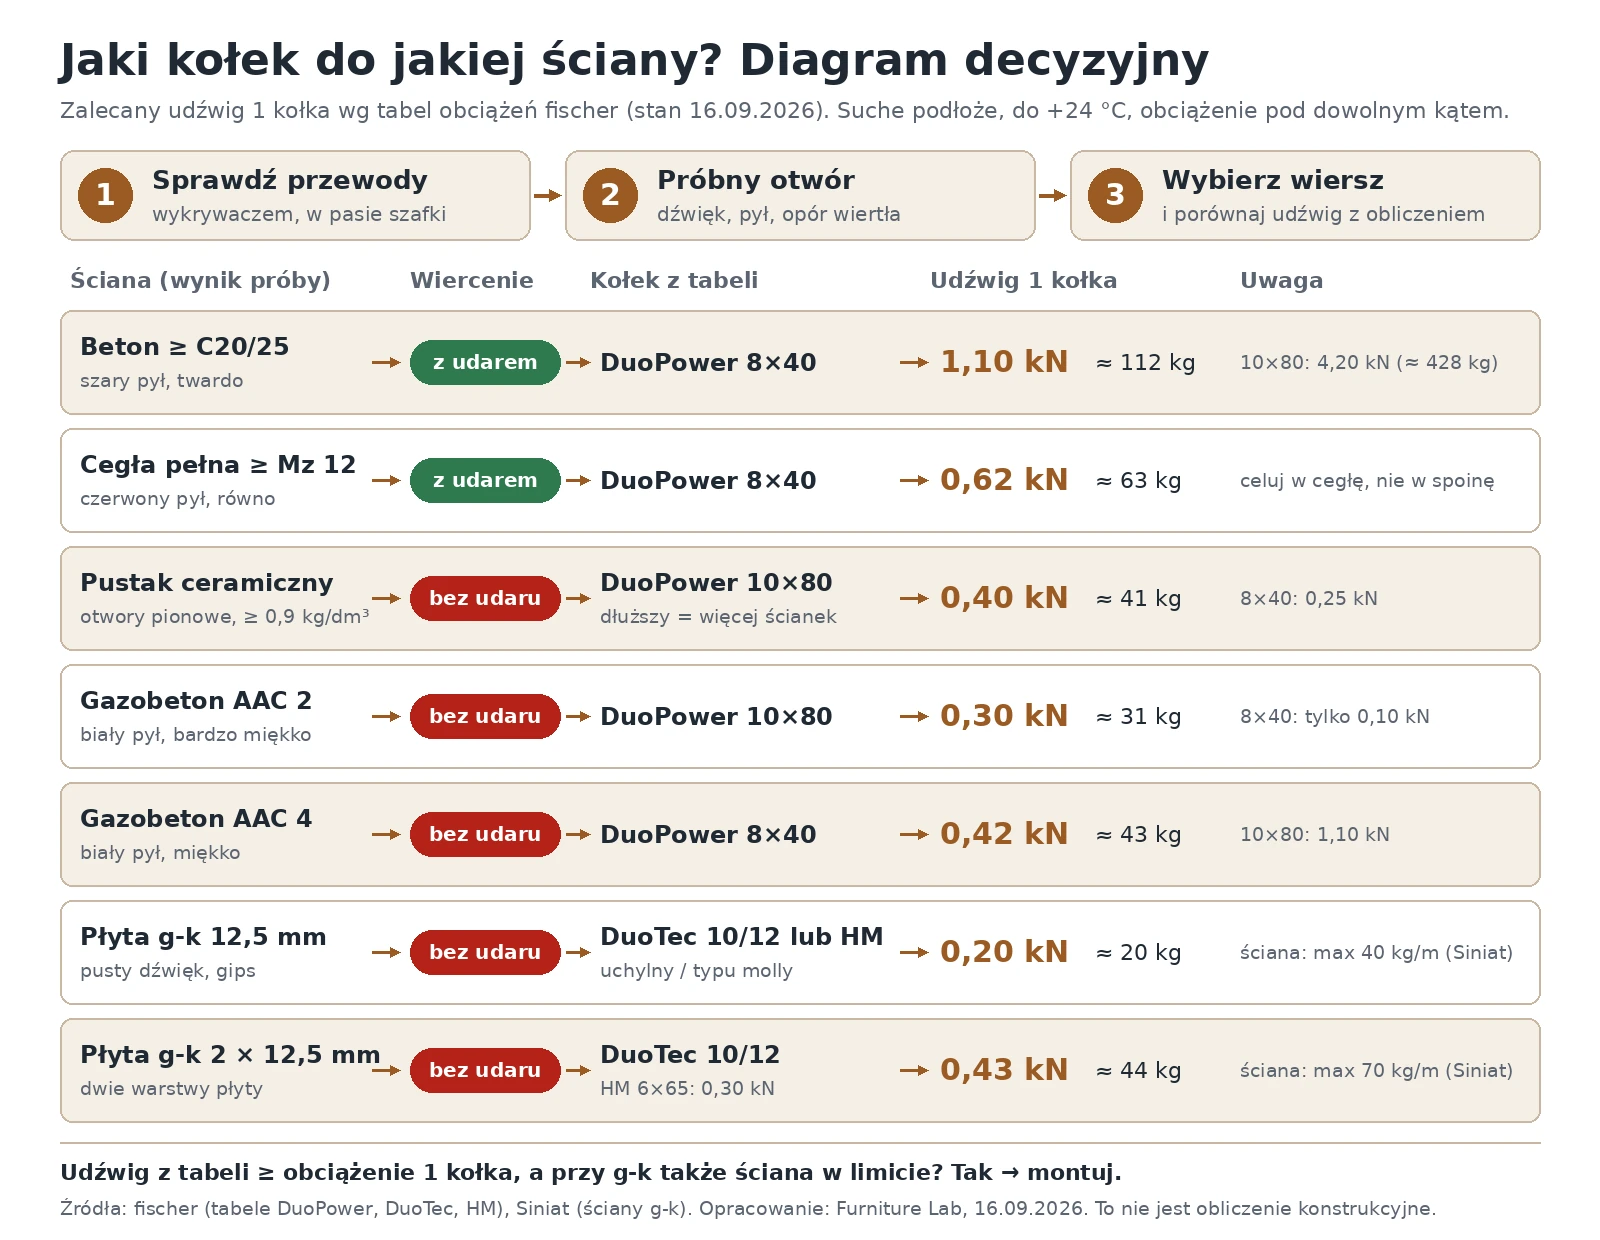
In short: to hang a wall cabinet, check for cables with a detector, identify the wall with a test hole and choose a plug for that substrate from the manufacturer's table. Then work out the load on one plug with a safety margin, and on plasterboard also the load per metre of wall. Finally fix a rail or a French cleat level and hang the cabinet.
Fitting a wall cabinet in 8 steps (summary):
- Check with a detector that no cables run where the holes will be.
- Identify the wall with a test hole.
- Work out the load on one plug, and on plasterboard also on the wall.
- Choose a plug for the substrate from the manufacturer's table.
- Mark a level fixing line.
- Drill the holes: with hammer action only in concrete and solid brick.
- Insert the plugs and screw on the rail or cleat.
- Hang the cabinet, level it and load it gradually.
The full description of the steps is in the section on fitting step by step. Notes on a row of kitchen cabinets are in the section on kitchen wall units.
What we prepared ourselves:
- a decision diagram "wall → plug → load capacity",
- a worked example for a TV unit with a television and a printable calculation sheet,
- a table of the load on one plug for cabinets of different weight and depth, independent of plug brand,
- a list of the places where manufacturers' sources differ, with our conclusion.
What is the wall made of? Identifying it in five minutes
You can identify the wall type from three things: the sound when you tap it, the colour of the drill dust and how the bit behaves in the hole. One test hole is enough, in a spot the cabinet will cover anyway (check it with a cable detector first). Everything else depends on the result, because the recommended load of the same plug changes more than tenfold between materials.
| Wall | Sound when tapped | Dust and drill resistance | Watch out for |
|---|---|---|---|
| Concrete (poured, large-panel) | dull, hard | grey dust, the bit goes in slowly | reinforcing bar: do not drill through it, move the hole |
| Solid brick | hard | red or orange dust, even resistance | aim at the brick, not the mortar joint |
| Hollow clay block, perforated brick, porous ceramic | slightly dull | red dust, the bit keeps dropping into voids | drill without hammer action |
| Aerated concrete (AAC, e.g. Ytong, Solbet) | dull | white or light grey dust, the bit goes in very easily | strength class (e.g. 2 or 4) changes the capacity about fourfold |
| Plasterboard on studs | hollow, drumming; fuller at a stud | white gypsum, after the board thickness the bit drops into a void | number of board layers and stud positions |
Under thick plaster it is easy to mistake the materials. Judge the dust from deep in the hole, not from the first centimetre. If the wall has board cladding on adhesive, there may be masonry behind it, and then you anchor into the masonry.
Planning a TV unit across the whole wall? First see how to arrange a TV unit and shelving on a 3.5–5 m wall, and find ready-made models in the category made-to-measure TV units.
Which wall plug for which wall, and how much will it hold
You choose the plug to suit the wall material and check the capacity in the manufacturer's load table. fischer gives "recommended loads" for a single plug in its tables, with the required safety factors already included. The values apply to dry substrate at temperatures up to +24 °C and to a load acting at any angle.
| Substrate | fischer plug (size) | Recommended load of 1 plug | ≈ kg |
|---|---|---|---|
| Concrete ≥ C20/25 | DuoPower 8×40 | 1.10 kN | about 112 |
| Concrete ≥ C20/25 | DuoPower 10×80 | 4.20 kN | about 428 |
| Solid brick ≥ Mz 12 | DuoPower 8×40 | 0.62 kN | about 63 |
| Solid brick ≥ Mz 12 | DuoPower 10×80 | 1.45 kN | about 148 |
| Brick with vertical holes ≥ HLz 12 (density ≥ 0.9 kg/dm³) | DuoPower 8×40 | 0.25 kN | about 25 |
| Brick with vertical holes ≥ HLz 12 (density ≥ 0.9 kg/dm³) | DuoPower 10×80 | 0.40 kN | about 41 |
| Aerated concrete ≥ AAC 2 | DuoPower 8×40 | 0.10 kN | about 10 |
| Aerated concrete ≥ AAC 2 | DuoPower 10×80 | 0.30 kN | about 31 |
| Aerated concrete ≥ AAC 4 | DuoPower 8×40 | 0.42 kN | about 43 |
| Aerated concrete ≥ AAC 4 | DuoPower 10×80 | 1.10 kN | about 112 |
| Plasterboard 12.5 mm | DuoPower 8×40 | 0.15 kN | about 15 |
| Plasterboard 12.5 mm | HM 5×52 S (metal, Molly type) | 0.20 kN | about 20 |
| Plasterboard 12.5 mm | DuoTec 10 / 12 (toggle), span 625 mm | 0.20 kN | about 20 |
| Plasterboard 2 × 12.5 mm | DuoPower 8×40 | 0.20 kN | about 20 |
| Plasterboard 2 × 12.5 mm | HM 6×65 S (metal, Molly type) | 0.30 kN | about 31 |
| Plasterboard 2 × 12.5 mm | DuoTec 10 / 12 (toggle), span 625 mm | 0.43 kN | about 44 |
Sources: fischer load tables: DuoPower, DuoTec, HM (downloaded 15 September 2026, checked again 16 September 2026). The conversion to kg is ours: 1 kN ≈ 102 kg, rounded. These are recommended values for a single plug, provided the edge distances and spacings from the data sheet are kept. They depend on the quality of the substrate and of the installation. Check plugs of other brands in their own table.
The designations in the manufacturer's tables, in brief:
- kN (kilonewton) is a unit of force. 1 kN corresponds to the weight of about 102 kg (1000 N : 9.81 m/s²).
- C20/25 is a concrete class: characteristic compressive strength of 20 MPa on cylindrical samples and 25 MPa on cube samples (Wikipedia: Beton, in Polish).
- Mz is the German designation for solid brick (compare Vollziegel, VMz), and HLz for brick with vertical holes, Hochlochziegel (Wikipedia DE: Hochlochziegel). The ≥ sign before 12 means the value applies to material of that class or higher; the fischer table does not describe this class any further.
- AAC 2 and AAC 4 are aerated concrete of strength class 2 and 4 (in Germany "Festigkeitsklasse 2/4", Wikipedia DE: Porenbeton), not the density of the block.
- b is the span of the board in the construction ("span in the construction"), on which fischer bases the capacity of plugs for boards.
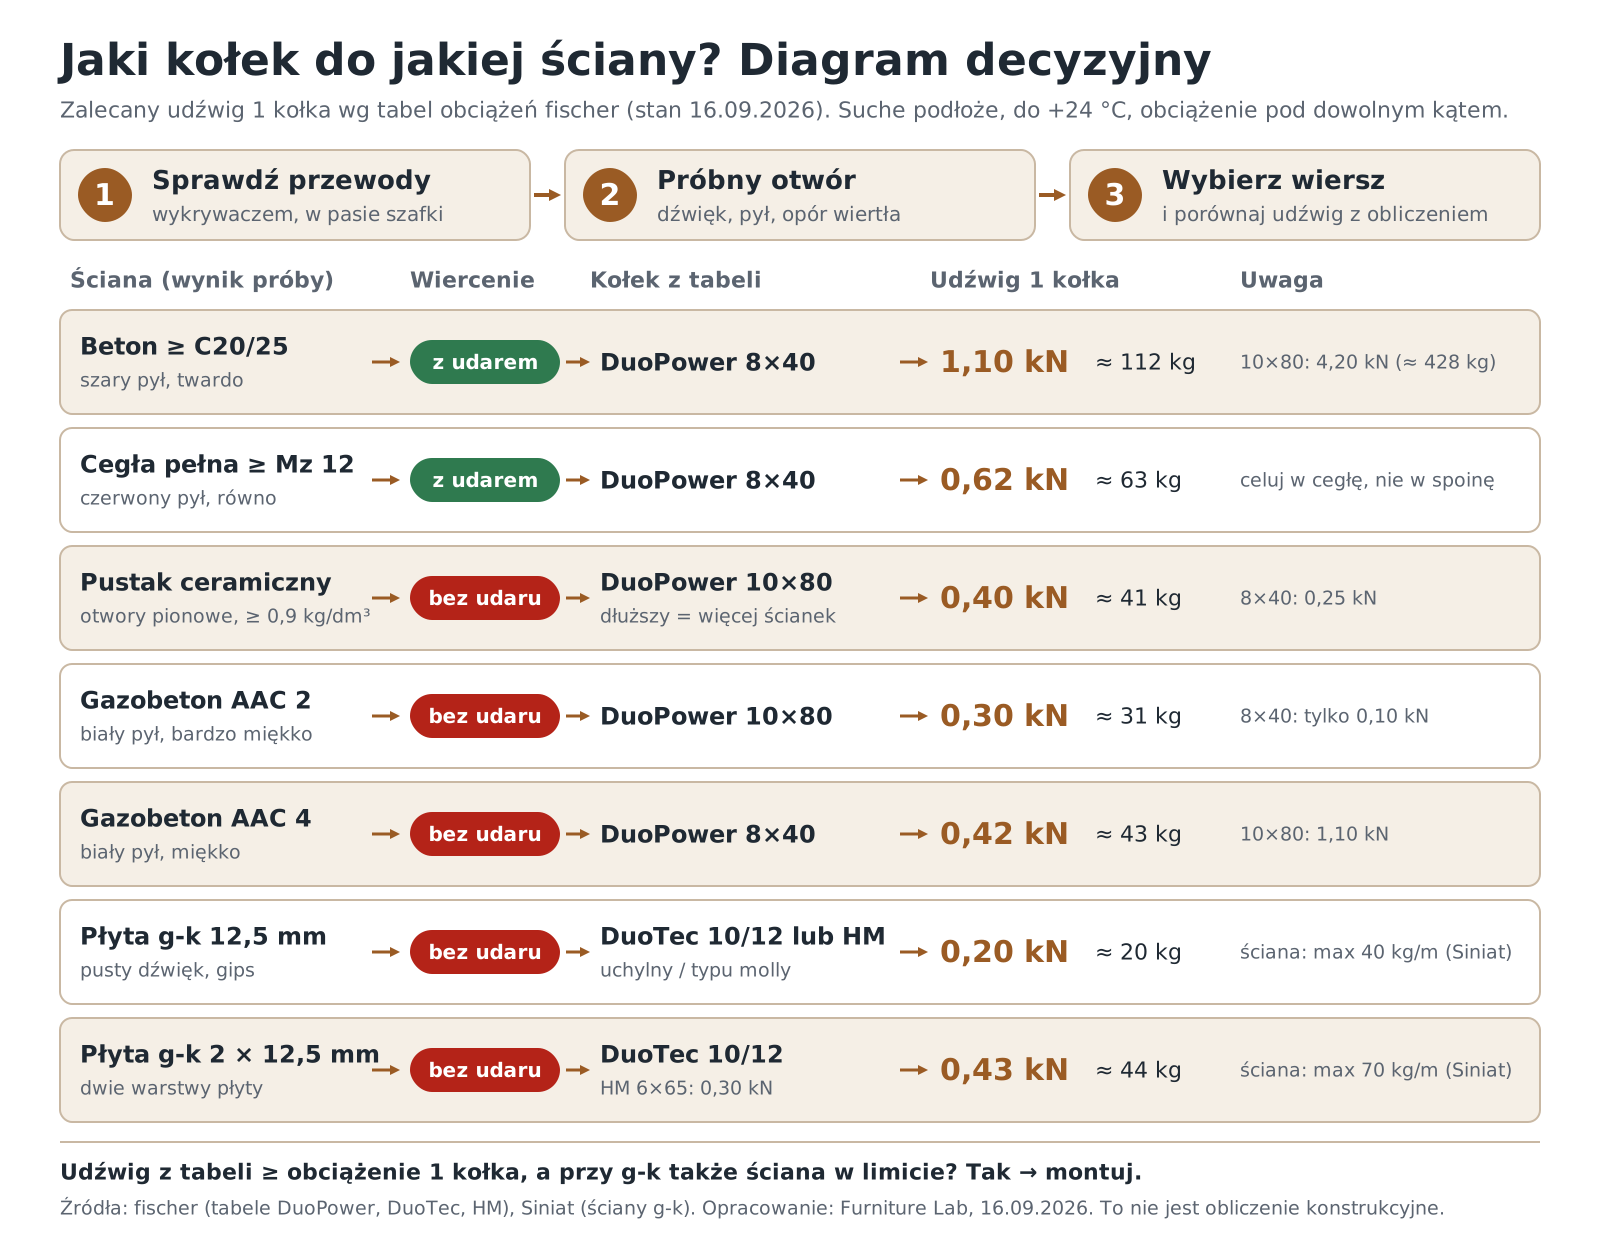
We set out the same table as a decision diagram at the start of the article: from the result of the test hole, through the drilling method, to the plug and its capacity. The diagram is a Furniture Lab compilation based on fischer tables and Siniat documentation. You can print it from the vector SVG version.
Recommended is not the same as breaking load
fischer tables give recommended loads, and in a footnote the manufacturer states that the required safety factors are included. For DuoTec it adds that the values are approximate and depend on the wall material and the quality of installation. The load at which a plug pulls out is therefore higher, but none of these tables states it. A load-test video, for example the plasterboard plug test by the Wall Done channel on the Rawlplug blog (in Polish), shows how much the fixing withstood in one test. It is not a value to plan a cabinet by.
Where sources differ and what follows
Putting the manufacturers' data sheets side by side shows five places where they give different values or call them different things. The conclusion in the last column is ours.
| Topic | Source 1 | Source 2 | Our conclusion |
|---|---|---|---|
| What to call the value in the fischer table | PDF table: "Recommended loads", with a footnote on safety factors | Polish DuoPower product page: columns "Maximum load in…" | treat the figures as recommended and do not plan right to the limit |
| Capacity of a plasterboard wall per metre | Siniat PL: 70 kg/m for a 60 × 35 cm cabinet on two Molly plugs, board not specified | Siniat DE: ≤ 40 kg/m with board ≥ 12.5 mm, ≤ 70 kg/m with ≥ 18 mm | if you do not know the board, assume 40 kg/m |
| Plug spacing in plasterboard | Siniat PL: about 150 mm (boards 12.5–18 mm), about 75 mm (cladding over 20 mm) | Siniat DE: ≥ 75 mm per DIN 18183-1, full capacity from ≥ 250 mm | plan at least 250 mm if the rail allows it |
| One figure for "plasterboard" | Rigips: there is no single universal value, capacity depends on the whole system | some guides in search results (checked 15 September 2026) give single figures without sources or conditions | do not use figures without conditions (board, plug, lever arm) for planning |
| GKM plug for kitchen cabinets | fischer guide: GKM "is suitable, among other things, in the kitchen for fixing heavy cabinets", also on tiles | GKM table: 0.08 kN in 12.5 mm board and 0.11 kN in 2 × 12.5 mm per plug | "heavy cabinets" means many GKM plugs: work out their number from the table |
Concrete and solid brick
In concrete and solid brick the expansion plug spreads in solid material, so it has the highest values in the table. You drill with hammer action. Measure the plug length from the masonry, not from the plaster surface: an 8×40 plug in two centimetres of plaster sits in the brick for only half its length.
Hollow clay block, perforated brick and brick with horizontal holes
In a hollow block the plug has nothing to expand against along its whole length. That is why DuoPower 8×40 has 0.25 kN in brick with vertical holes and 0.62 kN in solid brick. On the DuoPower product page fischer writes that the longer versions are especially useful in hollow blocks, aerated concrete and plaster. In the table the 10×80 has 0.40 kN in such brick.
Drill without hammer action. Hammer action breaks the thin walls of the cells and the plug loses its grip. Also check the drilling pictogram on the pack of your plug. The table applies to bricks with a density of at least 0.9 kg/dm³. If you do not know which blocks the wall was built from, do not assume the full value.
Brick with horizontal holes (the Polish "dziurawka") differs from the brick the table describes, which has vertical holes (HLz). For this brick treat the figures as a rough guide. For a heavy cabinet consider a chemical anchor with a mesh sleeve and check its capacity in the manufacturer's data sheet.
Aerated concrete (AAC, Ytong)
In aerated concrete the strength class of the block decides the capacity. The same DuoPower 8×40 has only 0.10 kN in AAC 2 and already 0.42 kN in AAC 4. In a weaker block choose a longer plug: the 10×80 has 0.30 kN in AAC 2.
You will find the strength class in the building documentation, or you can ask the contractor. Do not confuse it with the block density, which is given separately, in kg/m³.
Wall cabinet on plasterboard: on a stud or between studs?
On a plasterboard wall the capacity of the whole wall counts, and the plug is only one element. For stud walls, Siniat technical documentation allows cantilever loads of up to 0.4 kN/m with boarding ≥ 12.5 mm. With boarding ≥ 18 mm the limit rises to 0.7 kN/m. The centre of gravity may be at most 0.3 m from the wall.
Siniat itself converts these values to ≤ 40 kg and ≤ 70 kg per metre of wall. Loads from 0.7 to 1.5 kN/m (70–150 kg/m) need boarding ≥ 18 mm and extra elements: according to Siniat, for example UA profiles, cross-members or frames.
The Polish Siniat guide on fixing loads gives a permissible 70 kg per running metre. This applies to a 60 × 35 cm kitchen cabinet (width × depth) on two Molly-type plugs. For shelves and cabinets the guide recommends Molly screws or toggle plugs. It does not say which boarding this value applies to. Halving the cabinet depth to 17.5 cm doubles the permissible load.
The spacing between plugs, according to this guide, is at least about 150 mm for boards of 12.5, 15 and 18 mm, and about 75 mm for cladding over 20 mm. The German Siniat documentation gives ≥ 75 mm per DIN 18183-1 and recommends working out full capacity from a spacing of ≥ 250 mm. This data applies to walls built in Siniat systems.
In the Rigips guide on loads on plasterboard walls we read: "There is no single universal value for every plasterboard wall". The manufacturer also writes that in suitably chosen systems you can mount televisions weighing up to about 35 kg, and gives as an example a wall with double boarding of 2 × 12.5 mm. For kitchen cabinets Rigips points to double boarding and fixings such as 8 mm Molly screws and cabinet hanging rails.
Between studs: a Molly or toggle plug
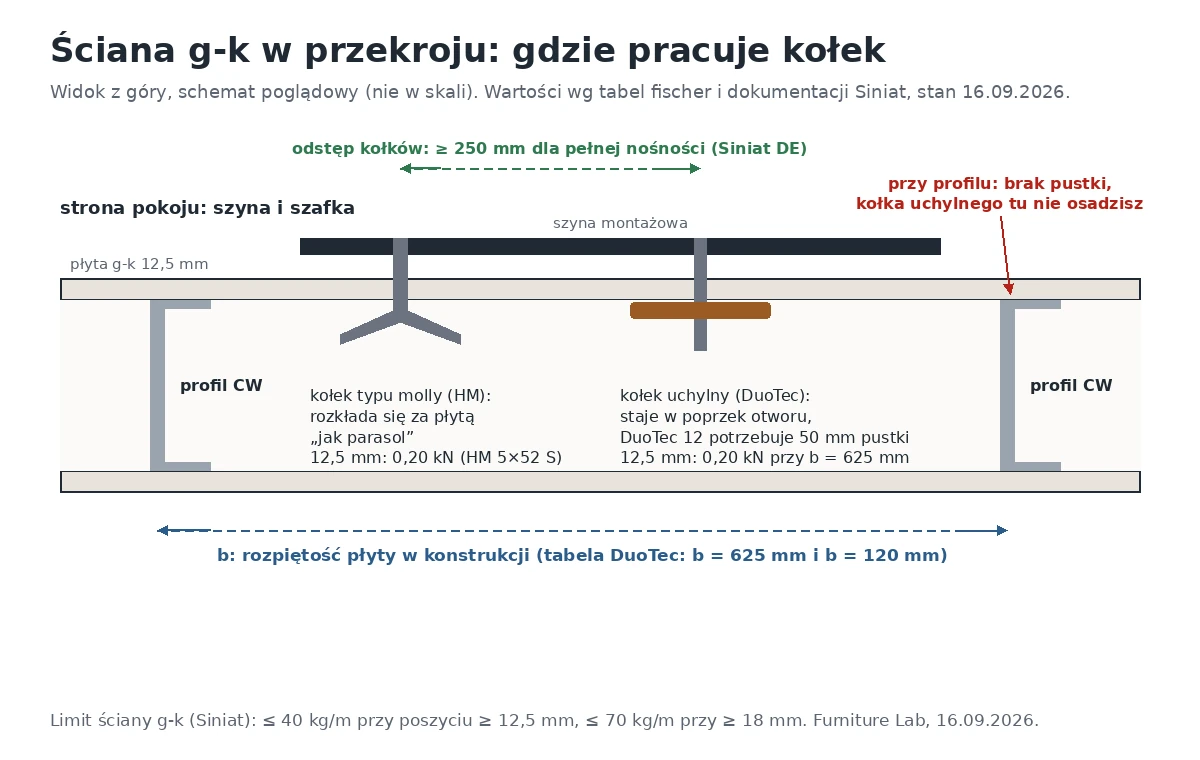
Between the studs, plugs for hollow spaces do the work. A metal plug of the Molly type (fischer: HM) opens out behind the board like an umbrella. A toggle plug, for example DuoTec, sits across the hole. In shops you will also find "umbrella" and "butterfly" plugs; check the capacity in the data sheet of the specific product.
A self-drilling plug, for example DuoBlade, is recommended by fischer for pictures, lamps, curtain rails and mirrors. For cabinets and shelves the same guide points to the DuoTec toggle plug.
The DuoTec table gives two values depending on the board span b. In 12.5 mm board it is 0.20 kN at b = 625 mm and 0.36 kN at b = 120 mm. The smaller the span, the higher the value in the table.
On a stud: you do not turn the wall into masonry
A toggle plug needs free space behind the board. For DuoTec 12 fischer gives a cavity depth of 50 mm, so you cannot set it where a stud is. Hitting a stud does not give you the capacity of masonry. For large loads Siniat recommends UA profiles made of 2 mm sheet steel, fitted as studs when the wall is built.
How to strengthen a plasterboard wall for cabinets
A plasterboard wall can be strengthened for cabinets in three ways described by system manufacturers:
- Thicker or double boarding. According to Siniat, boarding ≥ 18 mm raises the permissible cantilever load from 0.4 to 0.7 kN/m. For kitchen cabinets Rigips points to double boarding, and in the fischer table a DuoTec plug has 0.43 kN in 2 × 12.5 mm board instead of 0.20 kN.
- UA profiles. Siniat recommends UA sections of 2 mm sheet steel, fitted as studs at places of large loads.
- Cross-members and frames. For loads from 0.7 to 1.5 kN/m Siniat requires extra construction elements, for example cross-members or frames.
UA profiles and cross-members are fitted when the wall is built, so it is best to plan the reinforcement before the boarding goes on. The limit depends on the boarding: 40 kg/m for 12.5 mm and 70 kg/m for ≥ 18 mm. If the wall is already standing and the load exceeds the limit, choose a freestanding piece of furniture or hang the cabinet on a masonry wall.
Timber-frame wall with OSB or chipboard
In timber-frame houses there is sometimes a wood-based board under the cladding. For OSB alone, 18 mm at b = 625 mm, the DuoTec table gives 0.75 kN for DuoTec 10. DuoTec 12 with a 6 mm screw has 1.30 kN there. For 16 mm chipboard it is 0.71–0.80 kN, depending on the plug and screw. The table does not describe a "plasterboard on OSB" build-up, so with such a wall ask the plug manufacturer.
How much does a TV unit with a television weigh? Worked example
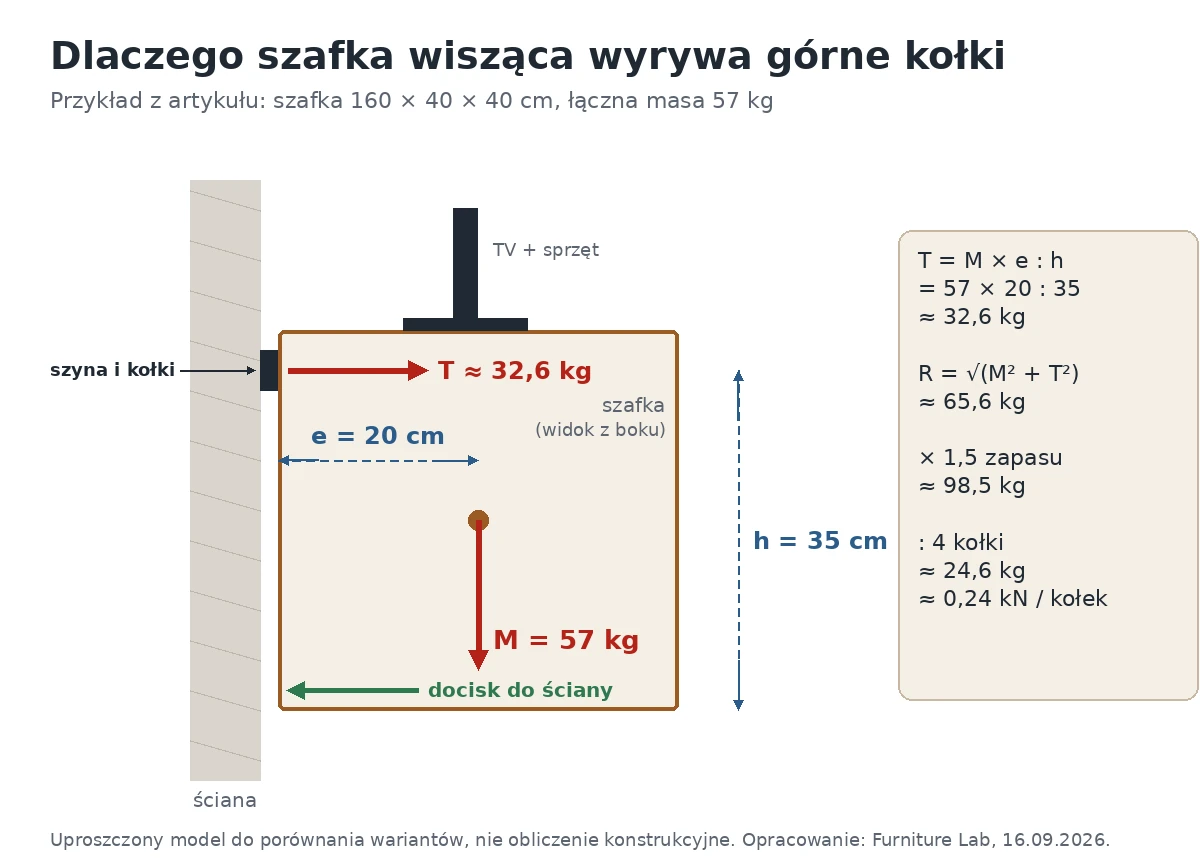
A wall-hung cabinet loads the plugs harder than its weight alone suggests, because it stands out from the wall and pulls on the upper fixings. In the example below, a total weight of 57 kg comes to about 25 kg on each of four plugs once the lever and the safety margin are included.
This is a simplified calculation for comparing options, not a structural calculation. The weights in the example are assumed, not weighed on a specific piece of furniture.
The product page of the Low TV unit (180 × 42 × 48 cm) does not give a fixing method. If you want to hang it, ask about the weight and fittings through the Furniture Lab contact form before choosing plugs.
Assumptions of the example (put in your own figures from the product data sheets):
- cabinet 160 × 40 × 40 cm (width × depth × height), weight 30 kg (example),
- television 18 kg (check the data sheet of your model),
- console 4 kg,
- contents: controllers, games, set-top box, 5 kg in total,
- fixing on a rail at the top of the cabinet, 35 cm above the bottom edge, which rests against the wall.
The calculation step by step:
- Total weight: 30 + 18 + 4 + 5 = 57 kg.
- Load on the wall per metre: 57 kg : 1.6 m ≈ 35.6 kg/m, and with a margin of 1.5 (see step 5) 35.6 × 1.5 ≈ 53.4 kg/m. You compare this figure with the limit of a plasterboard wall.
- Force pulling out the upper plugs: the centre of gravity is about 20 cm from the wall (half the depth), so 57 × 20 : 35 ≈ 32.6 kg.
- Resultant on the plugs: √(57² + 32.6²) ≈ 65.6 kg. The fischer tables apply to a load at any angle, so we compare the resultant.
- Margin of 1.5: 65.6 × 1.5 ≈ 98.5 kg. This is our own assumption for situations the table does not foresee, for example someone leaning on the cabinet. It is not a requirement of a standard.
- Per plug: with 4 plugs 24.6 kg (about 0.24 kN), with 6 plugs 16.4 kg (about 0.16 kN).
| Wall and plug (recommended load) | 4 plugs, 0.24 kN per plug | Conclusion |
|---|---|---|
| Concrete, DuoPower 8×40 (1.10 kN) | enough | large margin |
| Solid brick, DuoPower 8×40 (0.62 kN) | enough | margin of more than double |
| HLz brick with holes, DuoPower 8×40 (0.25 kN) | at the limit | better 10×80 (0.40 kN) or 6 plugs |
| Aerated concrete AAC 2, DuoPower 8×40 (0.10 kN) | not enough | 10×80 (0.30 kN) is enough |
| Aerated concrete AAC 4, DuoPower 8×40 (0.42 kN) | enough | margin |
| Plasterboard 12.5 mm, DuoTec (0.20 kN) | not enough | 6 plugs (0.16 kN) would be enough, but the wall is not: 53.4 kg/m > 40 kg/m |
| Plasterboard 2 × 12.5 mm, DuoTec (0.43 kN) | enough | the wall too: 53.4 kg/m ≤ 70 kg/m (25 mm boarding) |
In single plasterboard the limit is the wall, not the plug. Without the margin 35.6 kg/m fits within 40 kg/m, with our margin 53.4 kg/m does not, and adding plugs does not change that. Hang such a cabinet on a wall with boarding ≥ 18 mm or double boarding (limit 70 kg/m), or on masonry. If someone could sit on the cabinet, or the weight exceeds the values in the data sheets, ask a professional to assess it.
Table: load on one plug by weight and cabinet depth
We worked out this table with the same formula as the example, so it suits plugs of any brand. Find the row with a weight equal to or greater than yours and compare the result with the capacity of the plug from the manufacturer's table.
| Total weight | Cabinet depth | 4 plugs: per plug | 6 plugs: per plug |
|---|---|---|---|
| 20 kg | 30 cm | 8.2 kg (0.08 kN) | 5.4 kg (0.05 kN) |
| 20 kg | 40 cm | 8.6 kg (0.08 kN) | 5.8 kg (0.06 kN) |
| 20 kg | 60 cm | 9.9 kg (0.10 kN) | 6.6 kg (0.06 kN) |
| 40 kg | 30 cm | 16.3 kg (0.16 kN) | 10.9 kg (0.11 kN) |
| 40 kg | 40 cm | 17.3 kg (0.17 kN) | 11.5 kg (0.11 kN) |
| 40 kg | 60 cm | 19.8 kg (0.19 kN) | 13.2 kg (0.13 kN) |
| 60 kg | 30 cm | 24.5 kg (0.24 kN) | 16.3 kg (0.16 kN) |
| 60 kg | 40 cm | 25.9 kg (0.25 kN) | 17.3 kg (0.17 kN) |
| 60 kg | 60 cm | 29.6 kg (0.29 kN) | 19.8 kg (0.19 kN) |
Assumptions: centre of gravity at half the depth, rail 35 cm above the bottom edge of the cabinet, resultant as in step 4, margin of 1.5. A taller cabinet (greater h) gives smaller values. On plasterboard a cabinet 60 cm deep is at the Siniat limit of 0.3 m from the wall, and the load on the wall per metre has to be checked separately.
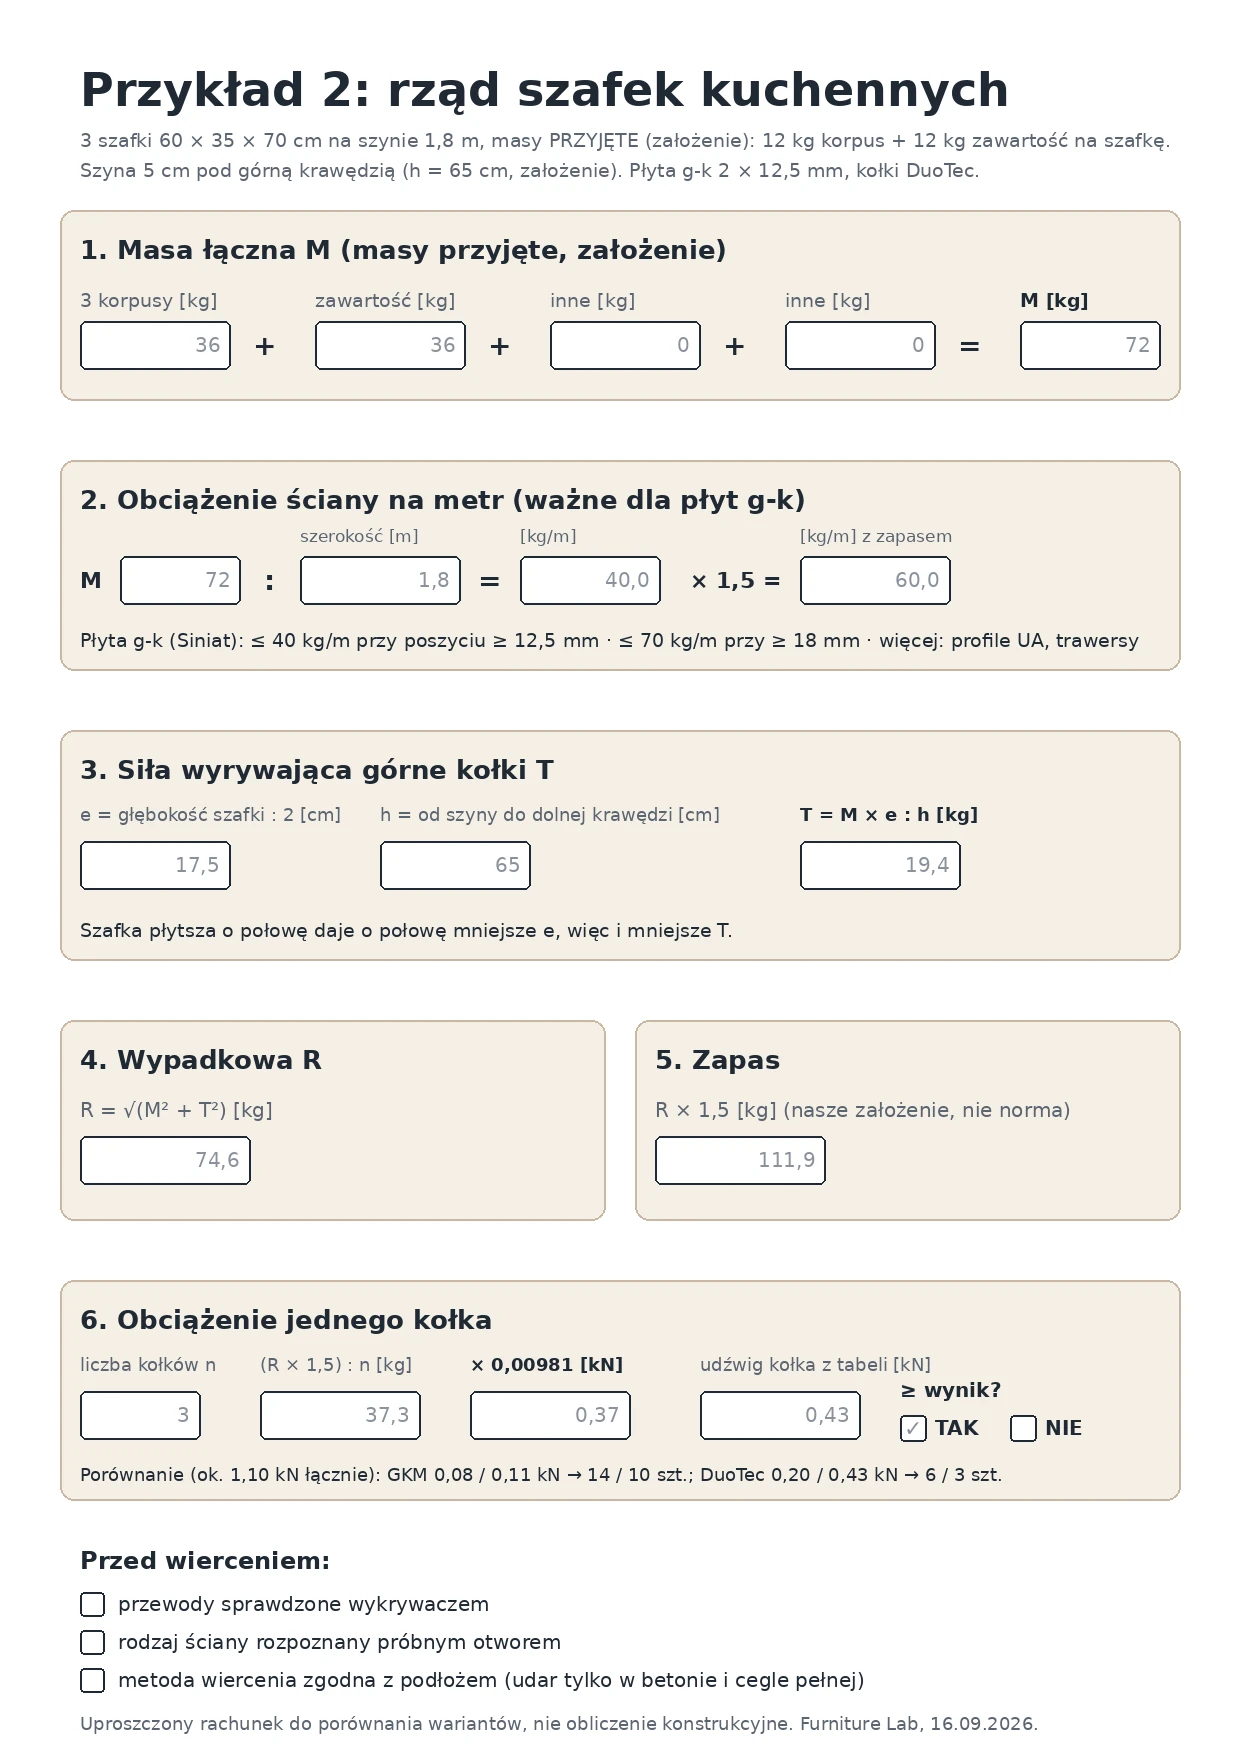
Printable calculation sheet. We put the whole calculation on one A4 page with empty fields. The example is the same: 57 kg, 53.4 kg/m, 24.6 kg per plug. The second page of the PDF contains an example of a row of kitchen cabinets. Download the wall cabinet calculation sheet (PDF). You enter the weights from the product data sheets, the width and depth of the cabinet, and at the end compare the result with the capacity of the plug from the table.
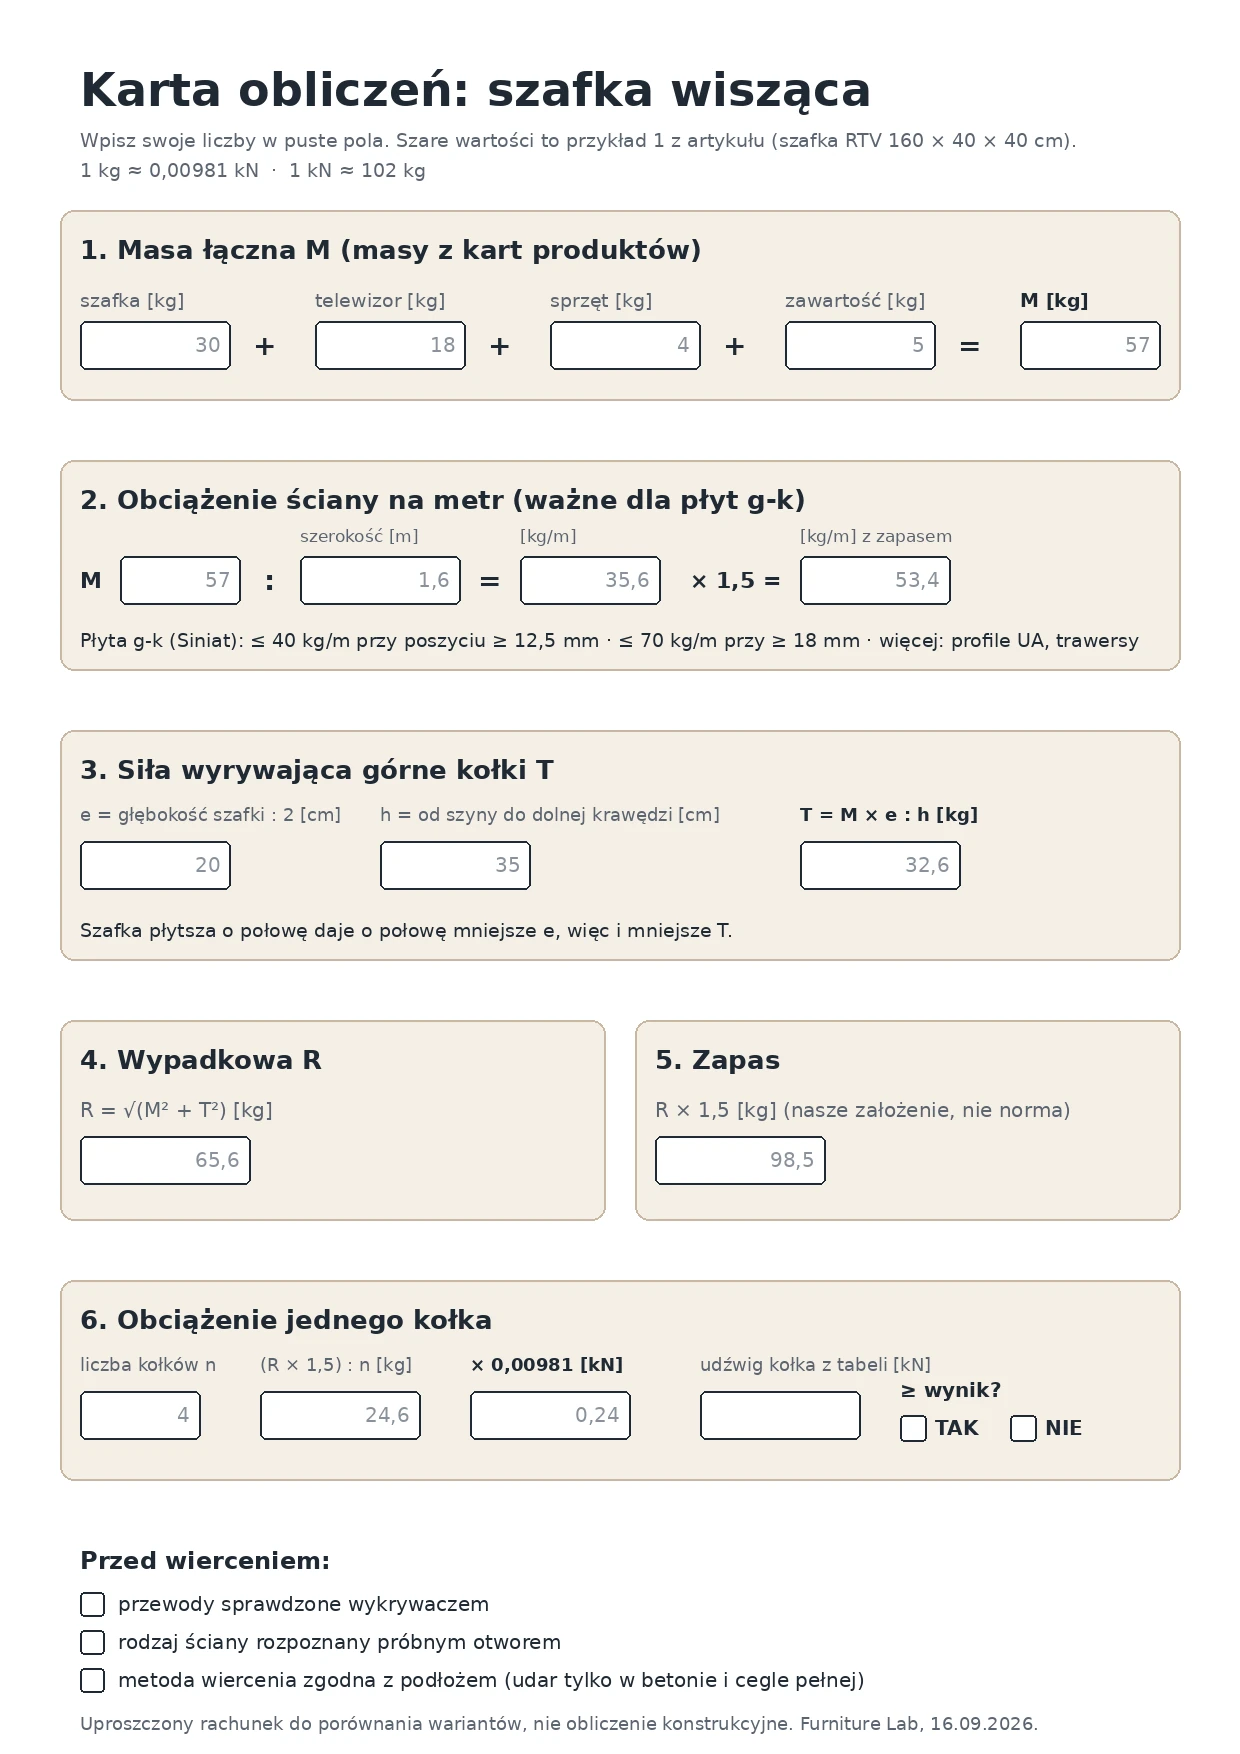
The same calculation is useful for any wall-hung cabinet, including a bathroom one.
If you are still choosing the furniture, see Furniture Lab made-to-measure furniture: you set the size in 1 cm steps on the product page or in the configurator, and the price is calculated live.
Kitchen wall units: a row of cabinets, rail and height
When several cabinets hang in a row in a kitchen, you calculate as above, but you add up the weight of the whole row and divide by its length. That is the figure to compare with the limit of a plasterboard wall. A smaller depth helps: according to Siniat a cabinet half as deep carries twice as much.
One rail for the whole row
A mounting rail along the whole row lets you space the plugs regardless of the width of the cabinets. You can then keep the spacing of ≥ 250 mm from which the German Siniat documentation recommends calculating full capacity in plasterboard. You hook each cabinet onto the same rail with hangers, so the plugs do not have to fall behind a particular cabinet.
GKM plug and cabinets on tiles
The fischer guide recommends the metal GKM plug for fixing heavy cabinets in the kitchen and notes that it can also be used on tiles. In the GKM load table the same manufacturer gives 0.08 kN per plug in 12.5 mm board and 0.11 kN in 2 × 12.5 mm board.
Our table shows that a 20 kg cabinet 30 cm deep on 4 plugs gives 0.08 kN per plug. That is exactly the GKM value in single board. A heavier cabinet full of crockery therefore needs more GKM plugs or a plug with a higher capacity, for example DuoTec (0.20 kN).
Example: three kitchen cabinets 60 × 35 cm on a 1.8 m rail
We calculate with the same method as the television example. The weights below are an assumption for the calculation, not weighed weights of specific cabinets.
Assumptions (assumed, not measured):
- 3 cabinets 60 × 35 × 70 cm (width × depth × height) on one rail 1.8 m long,
- carcass with front: 12 kg per cabinet (assumption),
- contents, for example crockery: 12 kg per cabinet (assumption),
- rail 5 cm below the top edge of the cabinets, so h = 65 cm (assumption); the bottom edge rests against the wall,
- plugs spaced evenly from one end of the rail to the other, so spacing = 180 cm : (number of plugs − 1).
The calculation:
- Total weight: 3 × (12 + 12) = 72 kg.
- Load on the wall per metre: 72 kg : 1.8 m = 40.0 kg/m, and with a margin of 1.5: 40.0 × 1.5 = 60.0 kg/m.
- Pull-out force: e = 35 : 2 = 17.5 cm, so T = 72 × 17.5 : 65 ≈ 19.4 kg.
- Resultant: √(72² + 19.4²) ≈ 74.6 kg.
- Margin of 1.5: 74.6 × 1.5 ≈ 111.9 kg, that is 111.9 × 0.00981 ≈ 1.10 kN for all the plugs together.
- Number of plugs: we divide 1.10 kN by the recommended load of one plug from the fischer table and round up.
| Boarding | Wall limit (Siniat) | Wall at 60.0 kg/m | GKM | DuoTec |
|---|---|---|---|---|
| 12.5 mm | ≤ 40 kg/m | exceeded | 0.08 kN: 1.10 : 0.08 ≈ 13.8 → 14 plugs, spacing about 13.8 cm | 0.20 kN: 1.10 : 0.20 = 5.5 → 6 plugs, spacing 36 cm |
| 2 × 12.5 mm | ≤ 70 kg/m (boarding ≥ 18 mm) | within the limit | 0.11 kN: 1.10 : 0.11 = 10 plugs, spacing 20 cm | 0.43 kN: 1.10 : 0.43 ≈ 2.6 → 3 plugs, spacing 90 cm |
What follows from this:
- Single 12.5 mm board is ruled out by the wall. Without the margin the row gives exactly 40.0 kg/m, the limit value, and with the margin 60.0 kg/m. Adding plugs does not change that. A spacing of 14 GKM plugs (about 13.8 cm) would also be smaller than the minimum of about 150 mm from the Polish Siniat guide.
- With 2 × 12.5 mm the wall fits within 70 kg/m. 10 GKM plugs every 20 cm meet the minimum of about 150 mm, but not the spacing of ≥ 250 mm from which the German Siniat documentation recommends calculating full capacity. 3 DuoTec plugs every 90 cm meet both conditions.
- The 70 kg/m value from the Polish Siniat guide (60 × 35 cm cabinet, two Molly plugs) is also not exceeded: 40.0 kg/m without the margin and 60.0 kg/m with it. But that guide does not state the boarding, so the limit that depends on the boarding decides.
The same example is on the second page of the calculation sheet (PDF).
Cabinet height and cables above the worktop
The height of the cabinets above the worktop comes from the kitchen design. If a cooker hood is to hang under the cabinet, check its instructions for the required distance from the hob. You set a TV unit relative to the screen, not the worktop.
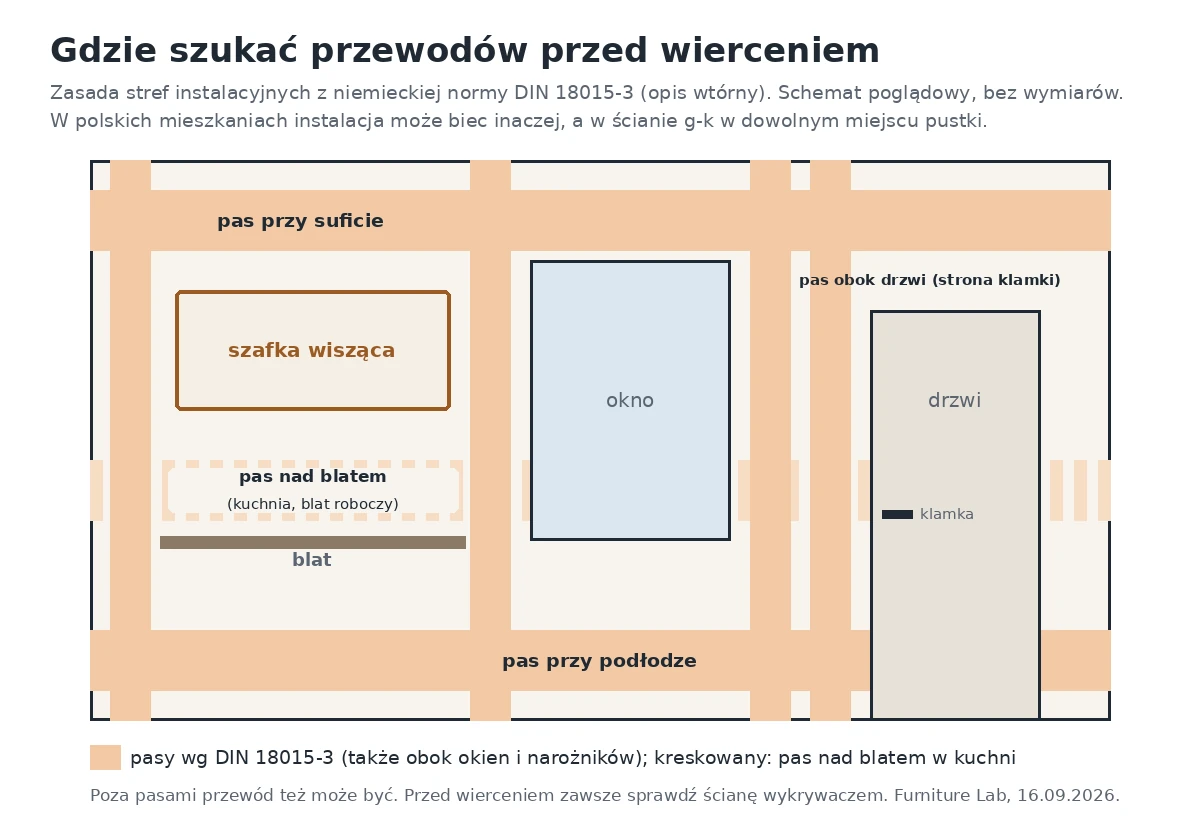
Before drilling, remember the cables above the worktop. In rooms with a work surface, the DIN 18015-3 standard provides an extra installation strip; more on that in the section on cables below.
Cables in the wall: where not to drill
Before drilling, check that no cable or pipe runs where the hole will be. You cannot tell by eye: in a plasterboard wall a cable may lie in the void between boards, and in masonry it may run in a chase under the plaster.
In Germany the DIN 18015-3 standard describes so-called installation zones in which cables are routed. These are strips by the floor, by the ceiling and next to corners, windows and doors. In kitchens and other rooms with a work surface there is also a middle strip above the worktop (description of the standard in German Wikipedia). It is a German, paid standard and we did not have its text, so we do not give the widths of the strips. In Polish homes the wiring may run differently, so treat the zone principle as a hint about where to look for cables, not as proof that the wall is empty outside the strips.
How to check the wall in practice:
- Cable detector. Move it horizontally and vertically across the whole strip where the holes will be. Range and modes (live cable, metal, timber) depend on the model, so check them in the instructions.
- Sockets and switches. A cable may run up, down or sideways from a box, so do not drill in a straight line from the box.
- Pipes. A metal detector will not show plastic pipes. Ask about the route of water and heating pipes, especially next to the bathroom and kitchen.
- Circuit. If you have doubts, switch off the circuit breaker for the time of drilling.
How to hang a wall cabinet step by step
You hang the cabinet in eight steps: checking for cables, identifying the wall, calculating the load, marking the line, marking the holes, drilling, setting the plugs and hanging. The first three decide the choice of plugs, so do not skip them even for a light cabinet.
Mounting rail or French cleat?
A mounting rail is a metal strip screwed to the wall, on which you hook the cabinet hangers. Rigips writes that double boarding and a suitably chosen fixing, for example 8 mm Molly screws and cabinet hanging rails, spread the load over a larger area of the wall. Hangers with adjustment let you set the cabinet vertical and level after it is hung.
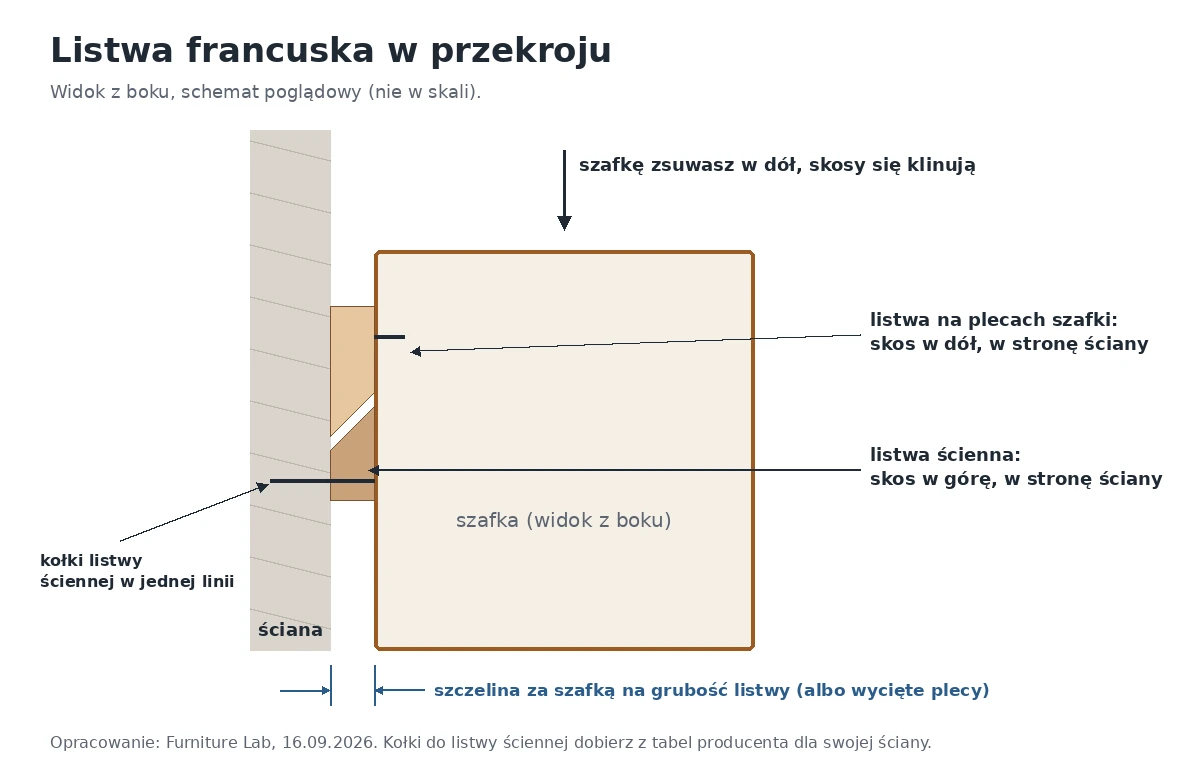
A French cleat is two strips with a 45° bevel. You screw one to the wall with the bevel facing up and towards the wall, the other to the back of the cabinet with the bevel facing down. The cabinet slides onto the cleat and wedges itself. All the plugs are in one line, and the cabinet is easy to take down. The downside is a gap behind the cabinet the thickness of the cleat, or the need to cut out the back panel.
Tools and materials
- cable detector,
- drill with hammer action that can be switched off, and bits of the diameter given in the plug data sheet,
- spirit level or cross-line laser, tape measure, pencil,
- vacuum cleaner or pump to blow dust out of the hole,
- cordless screwdriver and a screwdriver for final tightening by hand,
- plugs with a load table, chosen for the wall (for Molly-type plugs a setting tool for expanding them is useful),
- mounting rail with hangers or a French cleat,
- calculation sheet (PDF) with the weights filled in.
Fitting in eight steps
- Check for cables with a detector in a strip wider than the cabinet.
- Identify the wall with a test hole in a spot the cabinet will cover.
- Work out the load as in the example above and choose plugs from the manufacturer's table. Buy plugs with a load table, not a set without data.
- Mark the line with a spirit level or laser. Choose the height of a TV unit to suit the screen and the seating; a hint is in the text on the height of the screen centre above the unit.
- Mark the holes through the rail or cleat. Keep the spacings from the plug data sheet. In plasterboard the Polish Siniat guide gives a minimum of about 150 mm, and for full capacity the German Siniat documentation recommends ≥ 250 mm.
- Drill with the right method: with hammer action in concrete and solid brick, without it in hollow block, aerated concrete and plasterboard. Take the bit diameter from the plug data sheet (DuoTec 12: 12 mm). Clean the dust out of the hole.
- Set the plugs according to the instructions. With the metal GKM plug fischer warns not to overtighten it, especially with a cordless screwdriver.
- Screw on the rail or cleat, hang the cabinet, level it and load it gradually. Put the television and equipment on only after checking that nothing is moving.
A freestanding shelving unit should also be screwed to the wall
If you choose a tall shelving unit, for example the Linea shelving unit at 120 × 35 × 200 cm, and it is to stand on the floor, secure it against tipping by fixing it to the wall. Here the plug does not carry the weight of the furniture, it only holds it. Still choose the plug from the table for your wall.
If the shelving unit is to fill an alcove, see how to fit a shelving unit into an alcove and cover the gaps. You can set the dimensions of the shelving unit to the centimetre on the page made-to-measure bookcase.
Mistakes that make a wall cabinet come away from the wall
Each of the six mistakes below follows directly from the manufacturers' data discussed above. You make the first one in the shop.
- Plugs without a load table. A plug from a random set is not matched to your wall, and without a table you cannot check its capacity.
- Drilling with hammer action in hollow block. Broken cells give no grip and the plug spins in the hole.
- Measuring the plug length from the plaster. A plug that sits mainly in plaster does not hold like a plug in masonry.
- Plugs too close to each other or to an edge. For plasterboard Siniat gives a minimum of about 150 mm (Polish guide) and ≥ 250 mm for full capacity (German documentation). For DuoPower 8×40 in concrete fischer gives a minimum edge distance of 50 mm.
- Confusing a test result with the capacity. A video in which a plug withstands a lot before pulling out shows a limit. You plan by the recommended value from the manufacturer's data sheet.
- Ignoring the lever. A deep cabinet pulls out the upper plugs harder than a shallow one. Siniat shows that a cabinet half as deep can carry twice as much.
FAQ
How many kg will a plug hold in plasterboard?
It depends on the plug and the number of board layers. In fischer tables, in 12.5 mm board DuoPower 8×40 has a recommended load of 0.15 kN (about 15 kg), and HM 5×52 S and DuoTec 0.20 kN each (about 20 kg). In 2 × 12.5 mm board DuoTec has 0.43 kN (about 44 kg).
Is a Molly bolt enough for a wall cabinet?
A Molly-type plug (fischer: HM) is meant for hollow spaces and has 0.20 kN per plug in 12.5 mm board. For a cabinet you need several such plugs on a rail, and a wall that will carry the load per metre. According to Siniat, with boarding ≥ 12.5 mm the wall carries up to 0.4 kN/m (40 kg/m).
Which wall plugs for hollow bricks?
Choose a plug for materials with voids and drill without hammer action. In the fischer table DuoPower 8×40 has 0.25 kN in brick with vertical holes, and the 10×80 has 0.40 kN. Brick with horizontal holes differs from that, so treat these figures as a rough guide. For a heavier cabinet add plugs or use a chemical anchor according to the manufacturer's data.
Can you hang a TV unit on a plasterboard wall?
Yes, if the wall and the plugs carry the load. Rigips states that in suitably chosen systems, for example with double 2 × 12.5 mm boarding, you can mount televisions weighing up to about 35 kg. Work out the load per metre of wall and per plug as in the example above. Double boarding gives a clearly larger margin.
Where not to drill so as not to hit a cable?
You cannot settle that without checking. The German DIN 18015-3 standard describes strips by the floor, ceiling, windows, doors and corners, and in a kitchen also above the worktop. In Polish homes the wiring may run differently. Before drilling, scan the wall with a detector and avoid lines running from sockets and switches.
At what height should wall cabinets be hung?
In a kitchen the height comes from the design, and with a cooker hood also from the requirements in its instructions. You set a TV unit relative to the screen and the seating. Check for cables before drilling: in a kitchen the DIN 18015-3 standard provides an extra installation strip above the worktop.
Summary
Three things decide in practice how to hang a wall cabinet. The capacity depends on the wall: the same plug holds several times more in concrete than in hollow block or plasterboard. Calculate the load with the lever and a margin, not with the weight of the furniture alone. Check for cables with a detector, also above the worktop in a kitchen, because installation zones are no guarantee.
You can choose a TV unit in the category made-to-measure TV units, and set its size in 1 cm steps on the product page or in the configurator. Production takes up to 10 working days (how to count them on the calendar), courier delivery is free and the warranty covers 24 months.
You will find more practical instructions in the Do it yourself section.
How we prepared this text
- Data sources. We copied the plug capacities from the fischer load tables (DuoPower, DuoTec, HM), and the plasterboard wall limits from Siniat documentation and the Rigips guide. We checked all the sources on 15 September 2026 and the numerical values again on 16 September 2026. We could not download the Knauf guide pages that day, so we do not cite them.
- What we calculated ourselves. The editorial team prepared the conversion of kN to kg, the TV unit example, the decision diagram, the force diagram and the calculation sheet, based on this data. It is a simplified calculation, not a structural one.
- What we did not do. We did not test plugs in a laboratory or on walls, and we do not give our own measurements. We do not give the dimensions of installation zones from DIN 18015-3, because we had no access to its text; we describe the layout of the strips after German Wikipedia. We worked out the table of load on a plug by weight and cabinet depth ourselves, with the same formula as the example.
- How the text was made. A draft was prepared with the help of AI tools, and the numbers were compared again with the manufacturers' data sheets on 16 September 2026.
- Updates. If a manufacturer changes a load table, we will correct the values and the update date at the top of the article.
Sources
- fischer, DuoPower load table (Recommended loads): https://fiproductmedia.azureedge.net/media/Load%20Tables/Load%20Tables%20fischer/LT_DUOPOWER_EN_T1.pdf (accessed 15 September 2026, verified again 16 September 2026)
- fischer, DuoTec load table: https://fiproductmedia.azureedge.net/media/Load%20Tables/Load%20Tables%20fischer/LT_DUOTEC_EN_T1.pdf (accessed 15 September 2026, verified again 16 September 2026)
- fischer, HM load table: https://fiproductmedia.azureedge.net/media/Load%20Tables/Load%20Tables%20fischer/LT_HM_EN_T1.pdf (accessed 15 September 2026, verified again 16 September 2026)
- fischer Polska, "What to look for when choosing plugs for plasterboard?" (in Polish): https://www.fischerpolska.pl/pl-pl/fischer-stories/aktualnosci/kolki_do_karton_gipsu (accessed 15 September 2026, verified again 16 September 2026)
- fischer Polska, DuoPower product page: https://www.fischerpolska.pl/pl-pl/produkty/mocowania-standardowe/kolki-nylonowe/duopower (accessed 15 September 2026, verified again 16 September 2026)
- Siniat, Metallständerwände SW11–12 (technical documentation): https://media.siniat.de/pi52249/original/29064898/siniat-tb_sw11-12_metallstanderwande.pdf (accessed 15 September 2026, verified again 16 September 2026)
- Siniat Polska, Fixing loads to partition walls (in Polish): https://www.siniat.pl/pl-pl/centrum-wiedzy/instrukcje-montazu/90339/mocowanie-obciazen-na-sciankach-dzialowych/ (accessed 15 September 2026, verified again 16 September 2026)
- Rigips, Plasterboard walls without limits (24 June 2026, in Polish): https://www.rigips.pl/porady/sciany-g-k-bez-ograniczen-jak-bezpiecznie-montowac-obciazenia-elementy-wyposazenia (accessed 15 September 2026, verified again 16 September 2026)
- Rawlplug, blog post with a video by the Wall Done channel on plasterboard plugs (no figures in the text of the post, in Polish): https://rawlplug.com/pl/pl/blog/video-kamil-z-wall-done-zrobil-test-kolkow-do-plyt-g-k-rawlplug (accessed 16 September 2026)
- fischer, GKM load table: https://fiproductmedia.azureedge.net/media/Load%20Tables/Load%20Tables%20fischer/LT_GKM_EN_T1.pdf (accessed 16 September 2026)
- Wikipedia (PL), Beton, class C20/25: https://pl.wikipedia.org/wiki/Beton (accessed 16 September 2026)
- Wikipedia (DE), Hochlochziegel: https://de.wikipedia.org/wiki/Hochlochziegel and Mauerziegel: https://de.wikipedia.org/wiki/Mauerziegel (accessed 16 September 2026)
- Wikipedia (DE), Porenbeton (strength classes): https://de.wikipedia.org/wiki/Porenbeton (accessed 16 September 2026)
- Wikipedia (DE), Installationszone (secondary description of DIN 18015-3, including the strip above the worktop): https://de.wikipedia.org/wiki/Installationszone (accessed 16 September 2026)
- DIN 18015-3 (German standard, paid): mentioned without quoting dimensions, based on a secondary description.
Furniture for your wall, to the centimetre
See what you can design to measure, or go to the recommended page.
Read next
 Do it yourself
Alcove fitted furniture without a carpenter
Alcove fitted furniture without a carpenter: how much gap to leave, how to scribe a filler panel, a 132 × 248 cm example and a printable shopping list.
27 min read
 Furniture care
How to clean laminate and veneer furniture
How to clean laminate and veneer furniture? A YES/NO table for 12 household products, based on EGGER, Kronospan and oil makers. Check before you wash a front.
23 min read
 Advice
How to choose furniture colour: sample test
How to choose furniture colour when a screen and a bulb alter a decor's shade? Test a sample at home in 9 steps: light, floor, upright and flat. PDF checklist.
27 min read