How to repair a scratch on laminated furniture
How to repair a scratch on laminated furniture? Soft and hard wax, an iron for edging, oil for veneer. Find out when replacing the part is the better choice.
Autor: Amussim editorial team
Opublikowano:
Ostatnia aktualizacja:
24 min read
How to repair a scratch on laminated furniture? You mask a shallow one with wax rubbed in without melting, and you fill a deep one with melted hard wax and protect it with touch-up lacquer. Laminated board is particleboard covered with decorative paper impregnated with melamine resin (description of MF PB board, Kronospan), so minor damage to that layer can be hidden. Water is a worse case: swollen particleboard usually cannot be brought back to its original thickness.
If you are looking at a pale line on a desk top or at edging that is coming away on a cabinet under a washbasin, this guide helps you decide whether to repair or replace the part. We take the repair steps from the manufacturers' instructions. What we add ourselves is a printable diagnosis card with a materials list, a decision diagram "repair or replace" and a table of diagnosis, method and difficulty. There are also illustrations of a board cross-section and of the wax steps, a comparison of popular advice with the manufacturers' instructions and a conversion of the EN 312 requirements using an 18 mm board as an example.
In short. Rub shallow scratches with wax in the decor colour and wipe off the residue with a cloth. Fill a scratch that reaches the particleboard with melted hard wax, leaving a slight excess, level it with the applicator and protect it with touch-up lacquer, which dries in about 10–15 minutes. A board swollen by water usually cannot be repaired, so the part is replaced.
How to repair a scratch on laminated furniture step by step
The method depends on whether the scratch reaches the particleboard. A shallow scratch is masked with wax rubbed in without melting, and a deep one is filled with melted hard wax and sealed with lacquer. In both König instructions the first step is the same: the spot must be clean and degreased.
What to clean laminate with before a repair (no abrasive creams, solvent only on a small spot) is covered in our overview of furniture cleaning products. Is your furniture from us and less than 24 months old? Before you reach for wax, send us a photo of the damage through the contact form, because it may be a guarantee matter.
Before you decide how to repair a scratch on laminated furniture, check its depth. Look at the spot in light falling from the side and run a fingernail across the scratch. If the nail catches, or you can see pale or brown chips at the bottom, the laminate is broken through to the board. If not, the scratch is most likely shallow. The fingernail test is our practical tip, not a measurement.
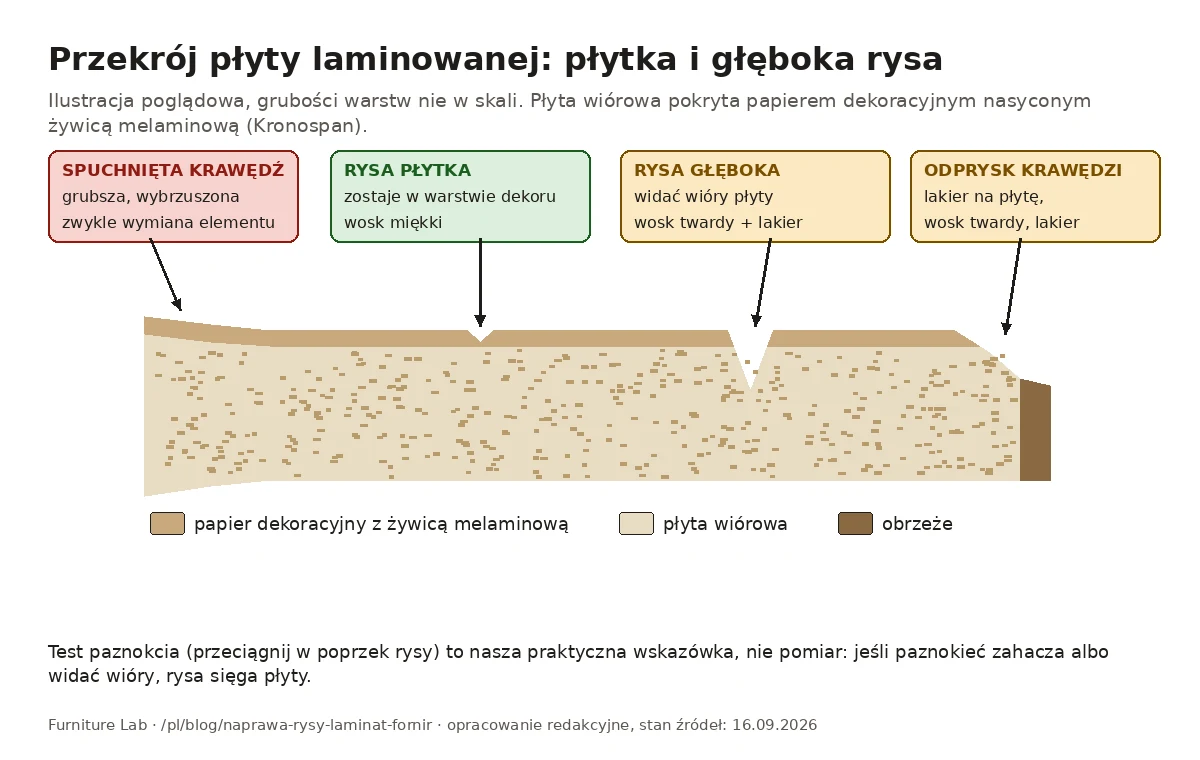
Surface scratch: soft wax, marker or touch-up crayon
Soft wax, meaning wax rubbed into the scratch without melting, is for shallow scratches. In its instructions for repairing light scratches on a cabinet König uses Duo Royale wax and describes six steps:
- Remove dust and loose particles with the edge of a small applicator.
- Match the wax colour to the surface and rub it in across the scratch.
- Spread the wax with the edge of the applicator in circular movements, with light pressure.
- If needed, mark the grain with a darker wax and level again with the applicator.
- Pull a cotton cloth over the applicator and wipe off the remaining wax.
- Finally, you can protect the spot with touch-up lacquer.
A furniture marker or pen in the decor colour tints the pale line but does not fill the loss. It therefore works for a scratch that is visible mainly because of its colour. With a touch-up crayon, check on the packaging whether it only tints or also fills the scratch. Do not sand laminate with abrasive paper or sharp paste, because the decor pattern sits on a thin paper impregnated with resin.
Deep scratch to the board: hard wax for furniture
Hard wax for furniture has to be melted before you apply it. König describes its Hard Wax Filler as a material for deep scratches, holes and edge damage on wood and decorative surfaces indoors. It also gives a melting temperature of 81°C. The steps come from the instructions for repairing scratches on wood and laminate.
When the scratch reaches the board, the König instructions go as follows. The illustration shows its seven steps, and below it we write them out in words.
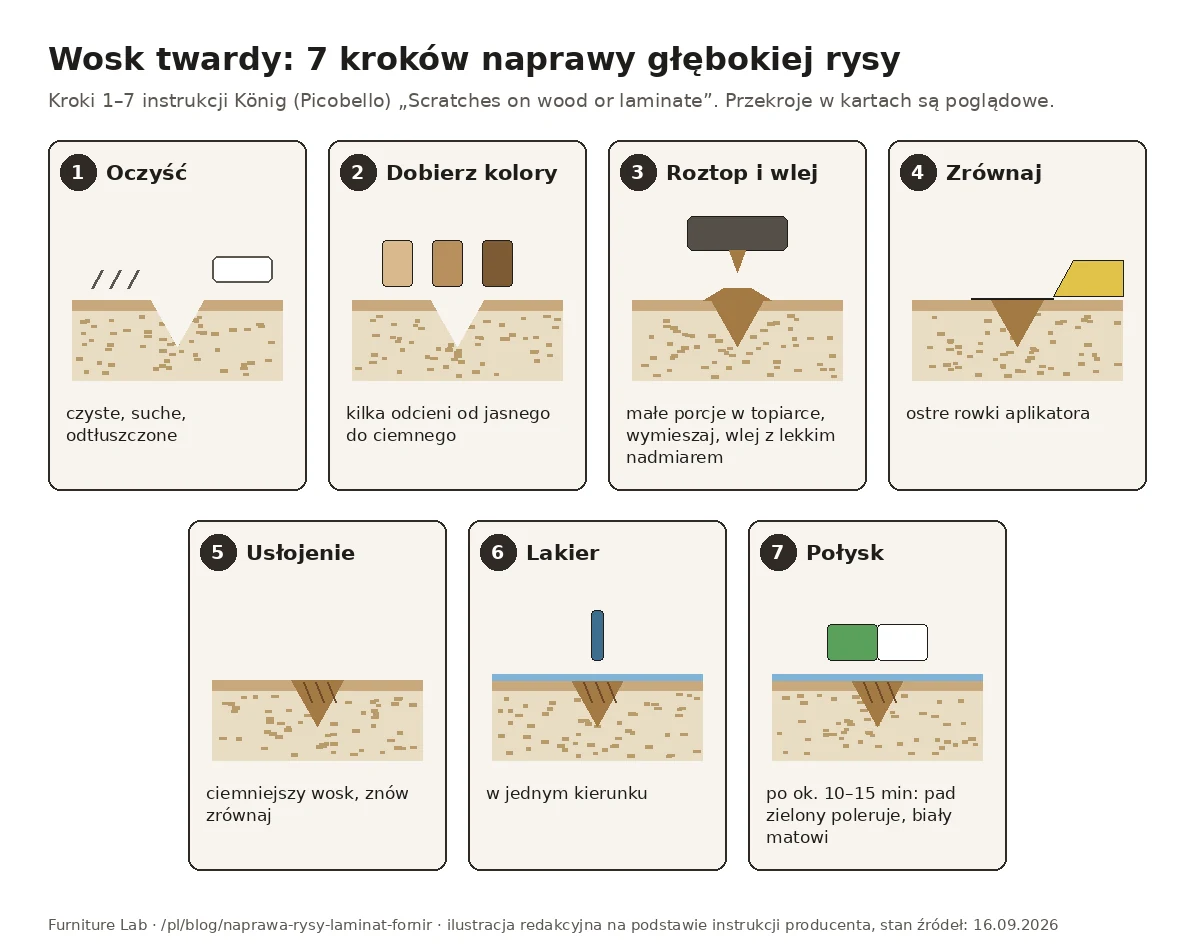
- Clean, dry and degrease the spot.
- Prepare several wax shades, from light to dark.
- Melt small portions of wax with a melting tool, mix them to match the colour and pour the mixture into the gap with a slight excess.
- Remove the excess with the sharp grooves of the filler applicator.
- Draw grain lines with a darker wax and level again.
- Apply touch-up lacquer in one direction.
- After about 10–15 minutes of drying, even out the gloss with the pad: the green side polishes, the white side matts.
You choose the colour to suit the decor. The tips below are our expansion of the König rule "several shades from light to dark". Test on an inconspicuous spot before you repair a visible one.
| Decor from our range | What to watch for when choosing wax |
|---|---|
| Natural Halifax Oak, Lincoln Walnut | 2–3 base shades and a darker wax for the grain lines |
| Matt White, Cashmere Grey | one matched shade; after the lacquer, matt the gloss with the white side of the pad |
| Dark Concrete | a mix of two shades of grey, without drawing grain |
If you buy wax in a shop, the decor name or code will help. How to read such designations is explained in the article on what the number and texture on a board label mean.
Scratch on a high-gloss front
König repairs a light scratch on a high-gloss surface without wax: with clear lacquer from a pen and polishing paste. The steps come from the tip "Scratches on high-gloss surfaces":
- Clean the spot: it must be clean, dry and degreased.
- Flatten the tip of the clear-lacquer pen by pressing it against a cotton cloth, and carefully paint over the scratch.
- After 1–2 minutes the lacquer is dust-dry. Wait about 2 hours.
- Polish the spot lightly with a small amount of fine polishing paste on a felt pad.
The tip does not specify which material it refers to. If it is high-gloss laminate, be careful with paste. In its cleaning recommendations for its surfaces (rev. 02, 31 October 2024) EGGER writes that abrasive agents can change the gloss level and scratch the surface. Rough cloths and melamine sponges can leave gloss marks if rubbed too hard, which the manufacturer treats as damage, sometimes permanent. Use polishing paste on laminate only if the furniture manufacturer permits it. Our range has no decor described as high gloss.
What kind of damage is it? Diagnosis and method table
You choose the repair method for other kinds of damage by cause and depth. A loss that reaches the particleboard and a chip on an edge are filled with hard wax. Edging is glued back only onto a dry board. Water swelling is partly a permanent change in the thickness of the board, so it usually ends in replacing the part.
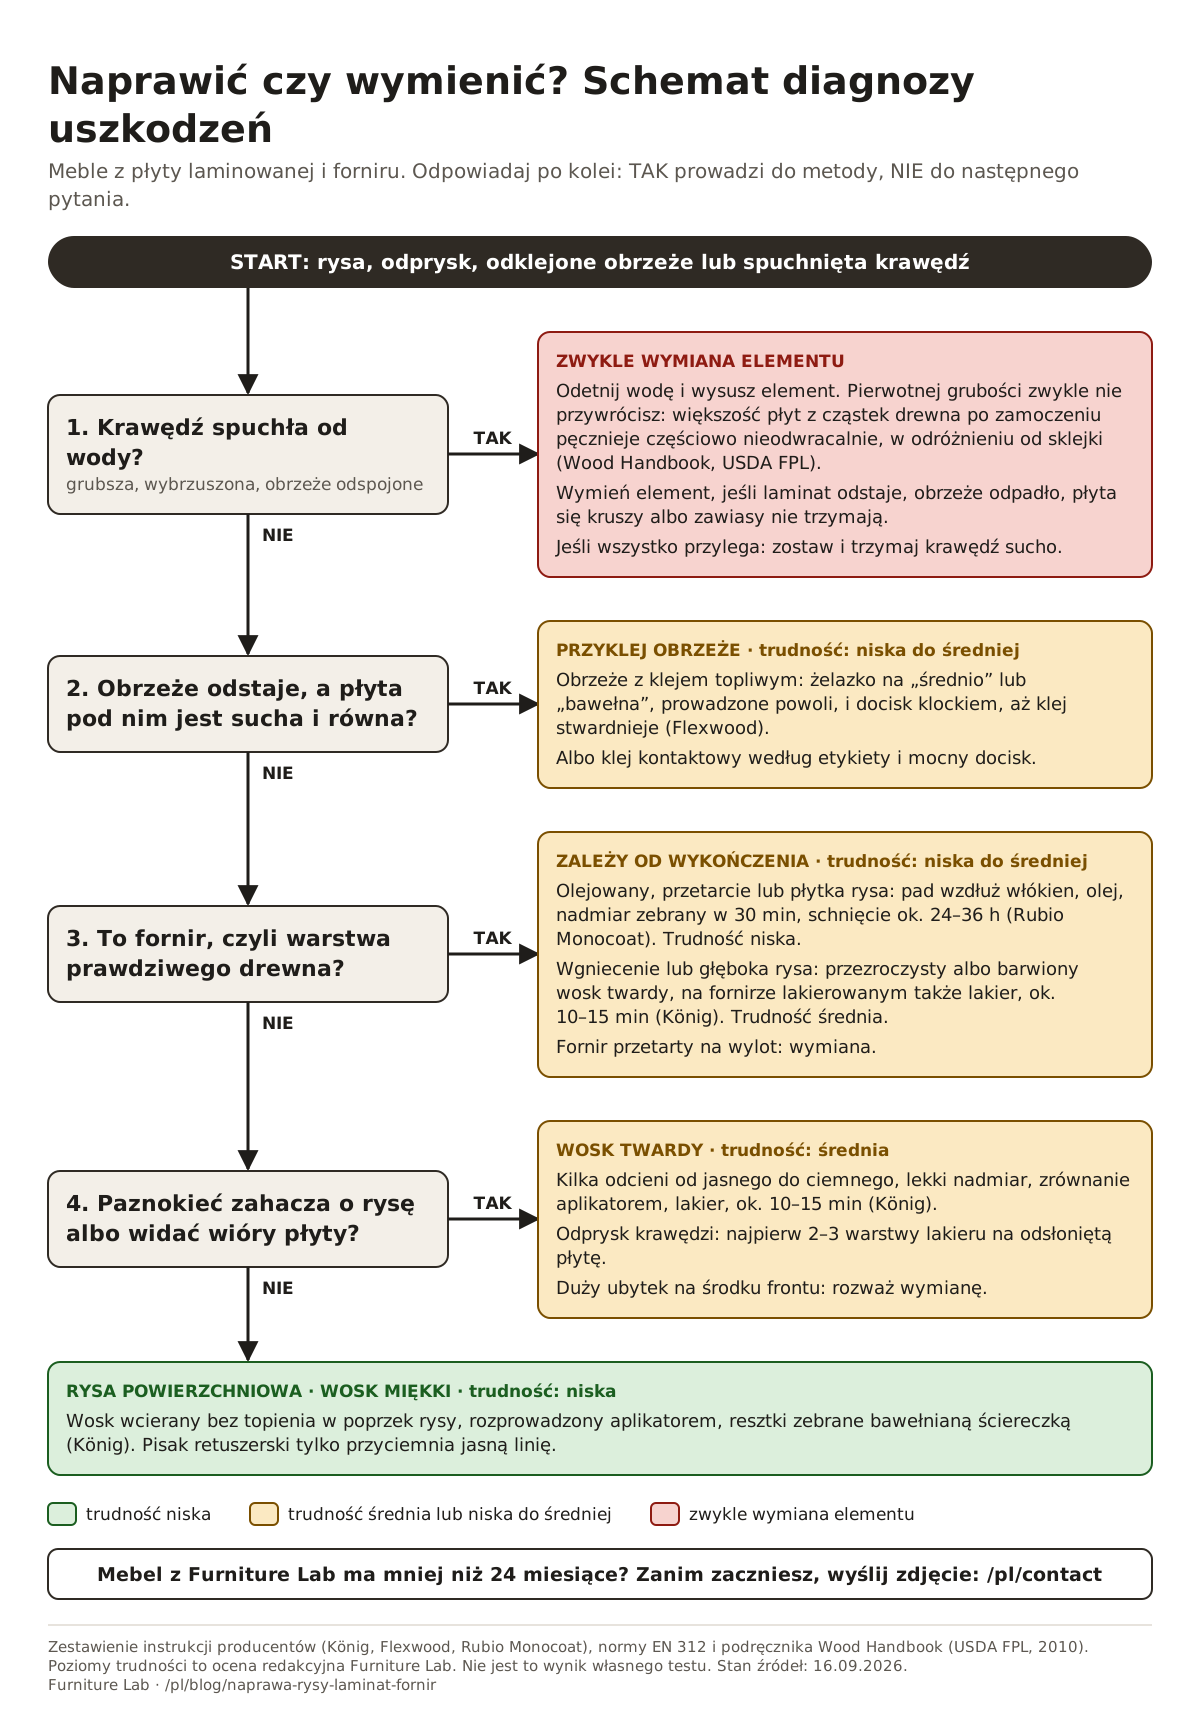
Answer four questions in order:
- Is the edge bulging or thicker than the rest of the board? This is a sign that the board has soaked up water.
- Is the edging coming away while the board under it is smooth? Then the glue has let go and you can try to stick the edging back.
- Is it veneer, and if so, oiled or lacquered? In our range, Oiled Oak and American Walnut have an oil finish. If you do not know how your furniture was finished, ask the manufacturer before you apply oil or lacquer.
- Does a fingernail catch on the scratch, or can you see chips at the bottom? We describe the test above, in the part about scratches.
| Damage | How to recognise it | Method and materials | Difficulty* and time per instructions | Result |
|---|---|---|---|---|
| Surface scratch on laminate | the nail does not catch, a pale line is visible | wax rubbed in without melting; touch-up pen only to darken the line | low; optional lacquer (time from other König instructions: about 10–15 min) | scratch less visible, especially at an angle |
| Deep scratch to the board | chips visible, the nail catches | hard wax melted with a melting tool, applicator, touch-up lacquer | medium; lacquer about 10–15 min | gap filled, repair visible from close up |
| Chip on an edge | a piece of laminate or edging missing | 2–3 coats of lacquer on the exposed board, hard wax, lacquer | medium; final lacquer about 10–15 min | edge levelled, colour close |
| Edging coming away (board dry) | edging sticks out, board under it is level | iron (edging with hot-melt glue) or contact adhesive and clamping | low to medium; clamp until the glue sets | edging adheres if the glue has taken along the whole length |
| Swollen particleboard | edge thicker, bulging, edging detached | cut off the water, dry, assess; usually replace the part | not applicable | original thickness usually cannot be restored |
| Dent in lacquered veneer | depression in the surface, no wood missing | clear hard wax, touch-up lacquer | medium; lacquer about 10–15 min | depression levelled |
| Worn oil on veneer | matt, grey or dry spot | cleaning, matting with a pad, renovation oil | low; collect excess oil within 30 min, drying about 24–36 h | spot blended into the rest of the surface |
* The difficulty level is our editorial assessment. The lacquer drying time (about 10–15 min) is given by the König instructions for scratches on wood and laminate, worktop edges and dents; the light-scratch instruction does not give it. The other times come from the Flexwood and Rubio Monocoat instructions linked below.
Diagram: repair or replace
The diagram is our arrangement of the table into four questions. First you check for water, then the edging, then the material and finally the depth of the scratch. A YES answer leads straight to a method or to the decision to replace the part, a NO answer to the next question. The colours match the "Difficulty" column in the table: green is low difficulty, yellow is medium or low to medium, red is usually replacement.
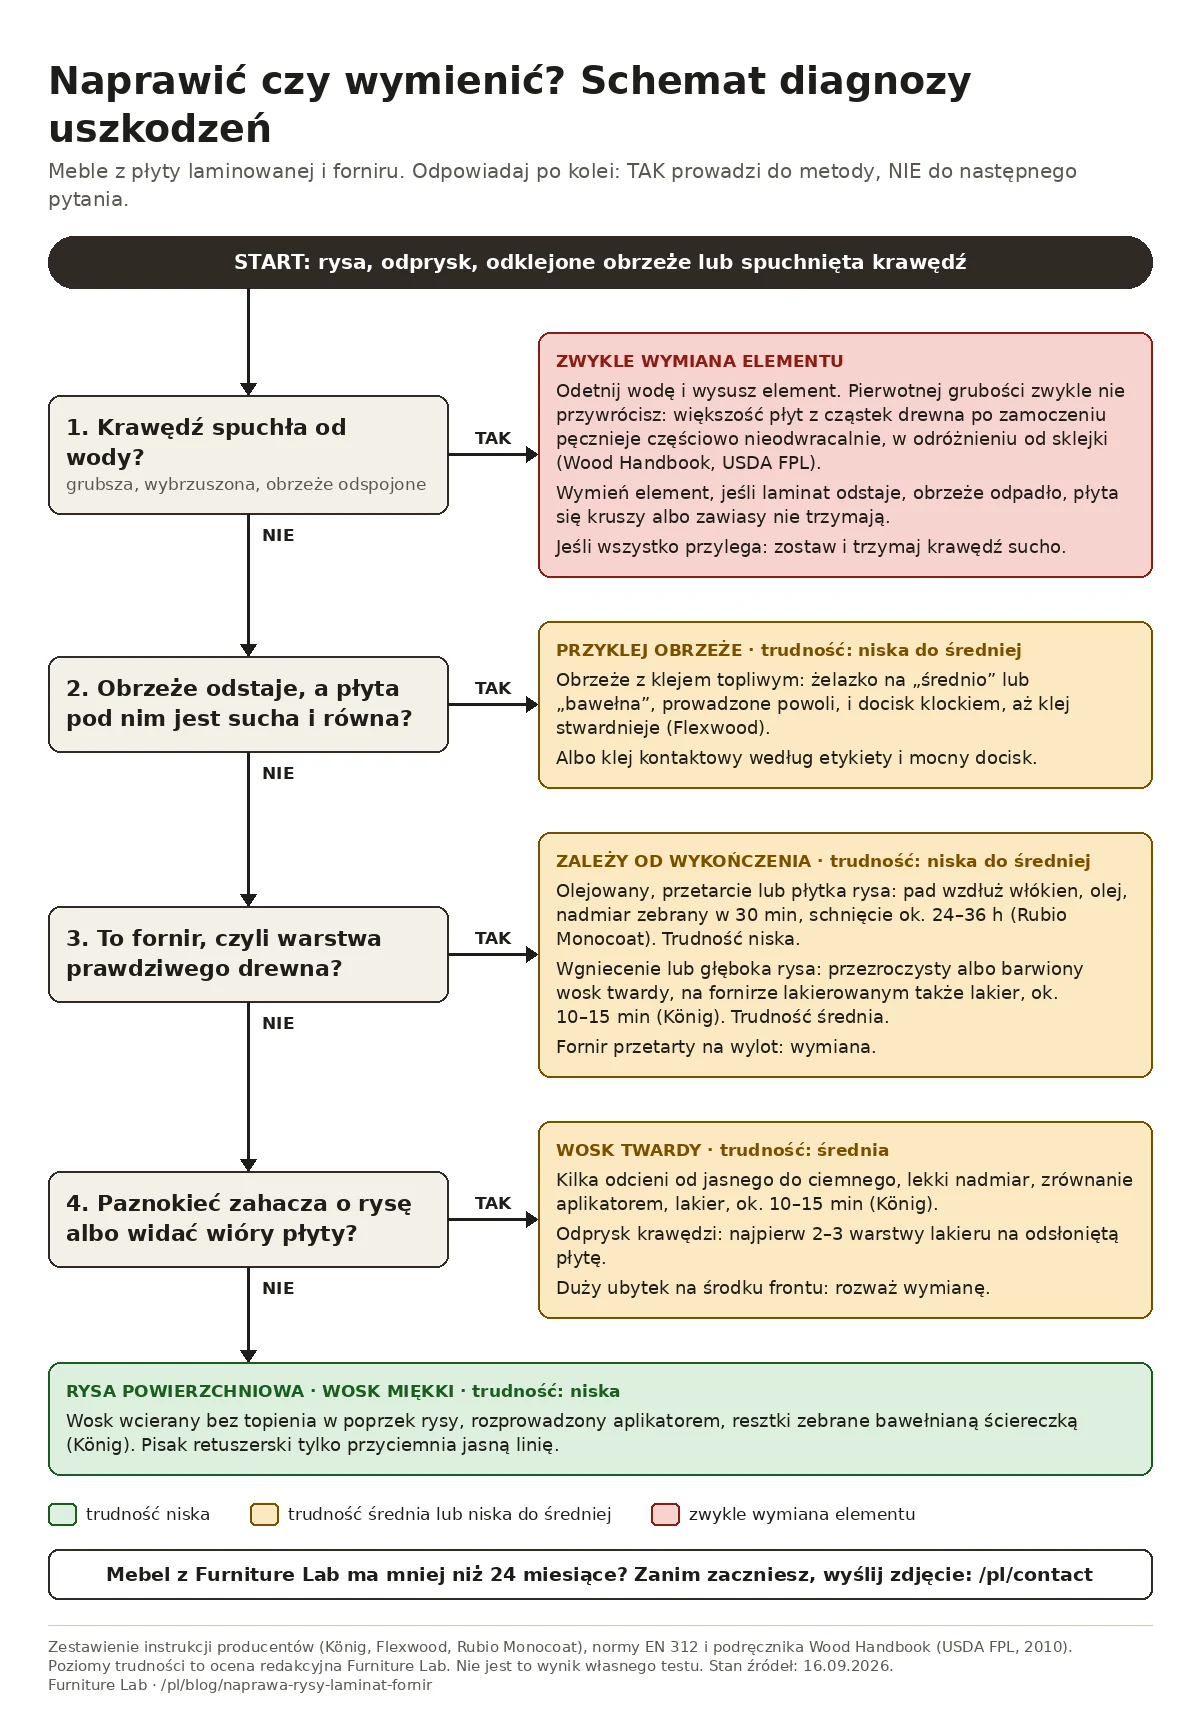
Download the diagram: SVG for printing (vector) · WebP 1200 px. The diagram combines the manufacturers' instructions and the standard. It is not the result of a test of ours.
Printable diagnosis card
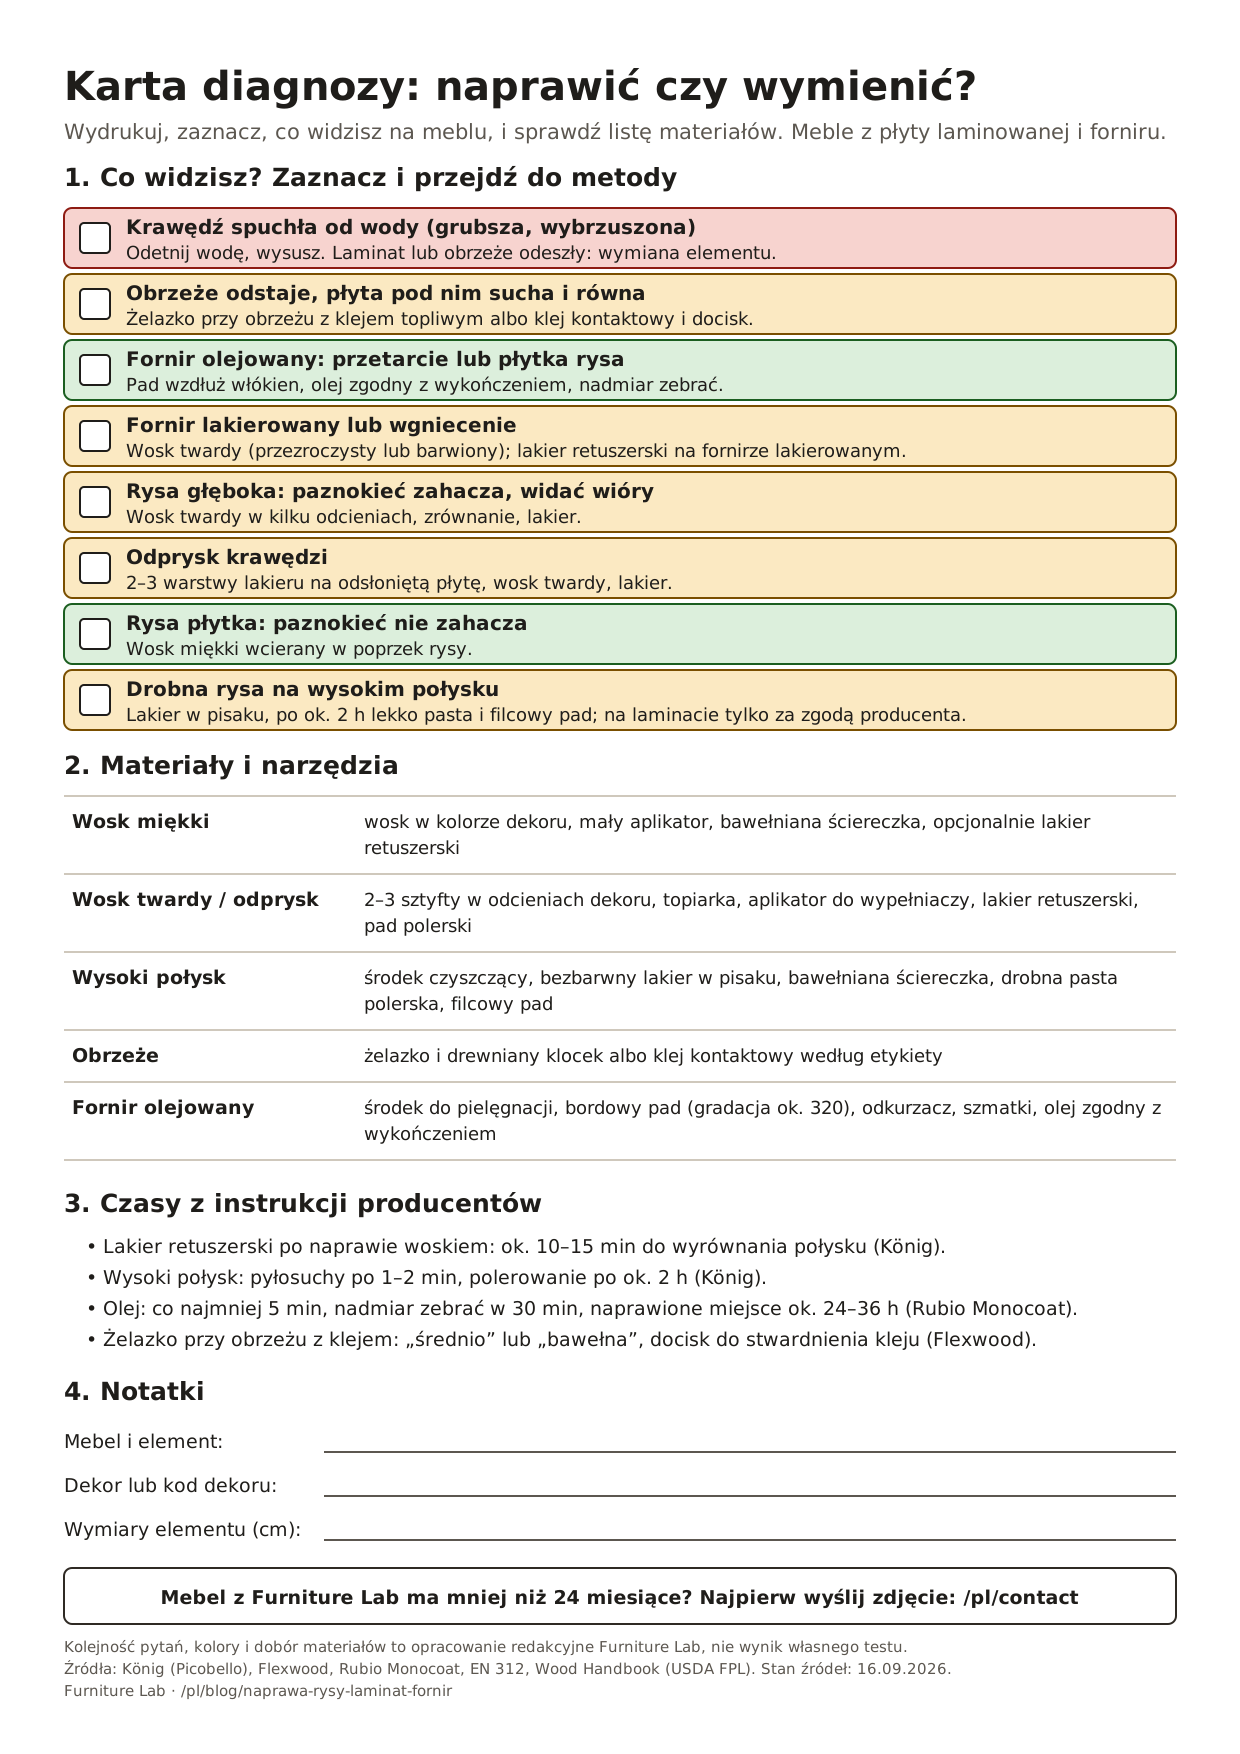
The diagnosis card is one A4 page with a checklist of damage, the materials and tools for each method, the times from the manufacturers' instructions and space for notes on the decor and the dimensions of the part. Print it before you go to the shop for wax: you tick what you see on the furniture and immediately see what to buy.
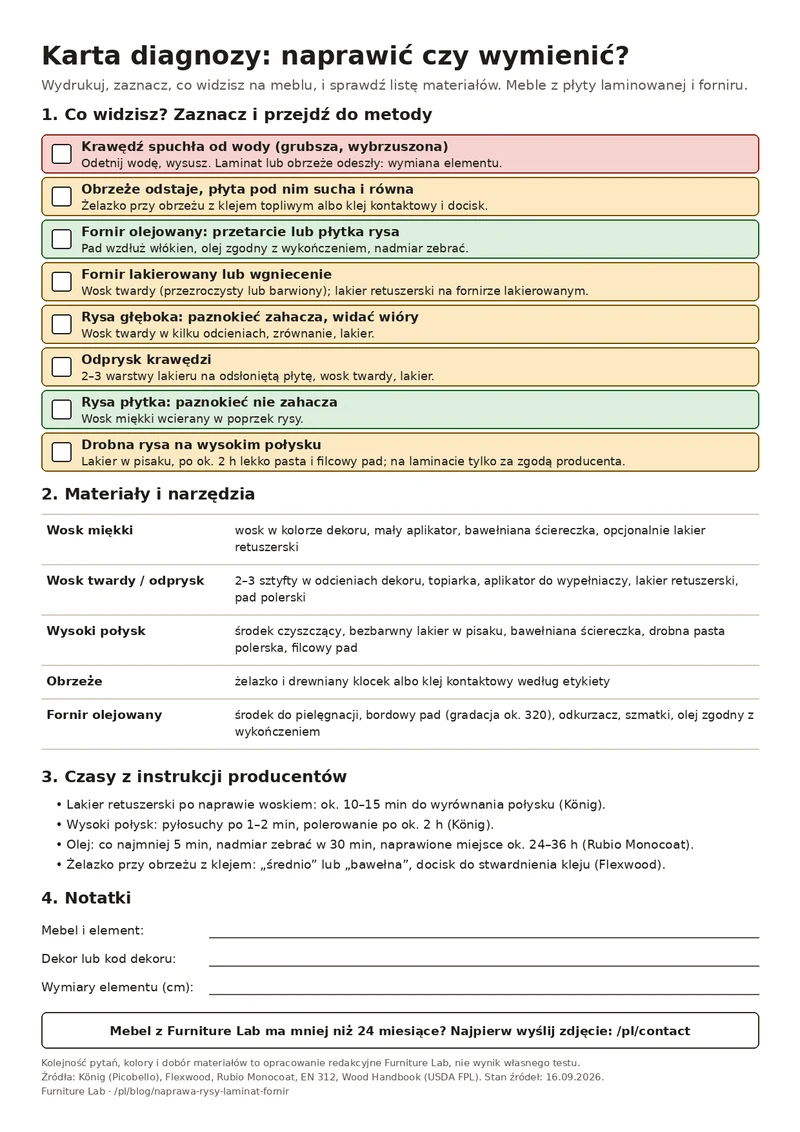
Download the card: A4 PDF · SVG (vector). We collected the materials on the card from the instructions linked in the text:
| Method | Materials and tools |
|---|---|
| Soft wax | wax in the decor colour, small applicator, cotton cloth, optional touch-up lacquer |
| Hard wax, chip | 2–3 wax sticks in decor shades, melting tool, filler applicator, touch-up lacquer, polishing pad |
| High gloss | cleaning agent, clear lacquer in a pen, cotton cloth, fine polishing paste, felt pad |
| Edging | iron and a wooden block, or contact adhesive according to the label |
| Oiled veneer | care product, burgundy pad (grit about 320), vacuum cleaner, cloths, oil matching the finish |
Chipped edge and loose edging
An edge is easy to knock, and just under the laminate and edging there is particleboard. You repair a chip with hard wax, with an extra step to protect the board. Edging that is coming away is stuck back with an iron or contact adhesive, but only if the board under it is dry and level.
Repairing a chip in laminated board
Repairing a chip in laminated board differs from repairing a scratch by one step at the start: the exposed board is first soaked with lacquer. In the instructions for repairing a damaged worktop edge König tells you to:
- Clean, dry and degrease the spot, removing loose crumbs.
- Soak the exposed board with AQUA Brush Pen lacquer in 2–3 coats, with drying breaks.
- Melt several shades of hard wax, from light to dark, and pour it in with a slight excess.
- Remove the excess from the edge with the round grooves of the applicator.
- Draw the grain with a darker wax and level again.
- Apply lacquer in one direction, preferably without touching the surrounding area.
- After about 10–15 minutes, even out the gloss with the pad.
On a corner that things often catch on, the fill may crumble again. Wax fills the gap but does not replace the edging.
Loose edging: how to stick it back
First check why the edging came away. If the board under it is bulging, glue will not help and you should go to the section on swollen board. If the board is dry and level, you have two home methods.
Iron (edging with a factory layer of hot-melt glue). The edging manufacturer Flexwood gives these steps in its instructions for pre-glued edging:
- Set the iron roughly to "medium" or "cotton".
- Press the iron onto the edging and move it slowly along the edge.
- Do not stop the iron in one place, because you may scorch the edging.
- Right behind the iron, press the edging with a wooden block until the glue sets.
- Check whether a thin bead of glue appears along the underside of the edging. This is a sign that the glue is melting and flowing.
The Flexwood instructions apply to veneer edging. For plastic edging (ABS, PVC), check the edging manufacturer's recommendations before you put an iron to it.
Contact adhesive. Remove old glue residue and dust, because the adhesive must grip a clean surface. Then follow the label on the adhesive. Usually you apply it thinly to both surfaces being joined, wait for the time the manufacturer gives and press the edging on firmly.
Edgings differ in thickness and in the way they are glued. What that changes in the durability of an edge, we show in the comparison of edging thicknesses and laser edging.
Swollen furniture board: is repair worth it?
Swollen particleboard usually cannot be restored to its original thickness. The Wood Handbook of the US Forest Products Laboratory notes that plywood, unlike most wood particle panels, swells irreversibly only to a minimal degree after soaking (chapter 11, 2010).
Drying will stop further damage but will not flatten the edge. Repairing a swollen furniture board therefore means, in practice, limiting the damage or replacing the part.
What the PN-EN 312 standard says
The EN 312 standard (PN-EN 312 in Poland) divides particleboard into types P1 to P7. Two of them matter for furniture:
| Type | Intended use per EN 312 | Thickness swelling requirement after 24 h (EN 317) |
|---|---|---|
| P2 | boards for interior fitting, including furniture, in dry conditions | no requirement |
| P3 | non-load-bearing boards for humid conditions | max. 14% for thickness above 13 to 20 mm |
Kronospan gives exactly type P2 for its laminated MF PB board. For P3 the standard relates "humid conditions" to service class 2 under EN 1995-1-1, in which air humidity exceeds 85% only for a few weeks a year. This does not mean resistance to standing water.
Example with our calculation. For a P3 board 18 mm thick, the standard permits swelling after 24 hours in water (tested per EN 317) of up to 14%, that is up to 2.52 mm (18 × 0.14). The limit applies to the 95th percentile of the mean results from individual boards, so not to every single sample. Even a board for humid conditions can therefore thicken noticeably after a flood. The class of the board in a specific piece of furniture is given by its manufacturer, so it is worth asking about it before buying a bathroom cabinet.
What to do when the board has soaked up water
- Cut off the source of water. Check the trap, the hoses and the seal at the washbasin. Wipe the water off the edges and from under the cabinet.
- Dry the part. Open the doors, take out the contents and wait until the board is dry.
- Assess the condition after drying. Slight thickening with intact laminate and edging that still adheres can be left as it is. Keep the edge dry from then on.
- Replace the part if the laminate has come away from the board, the edging has fallen off, the board is crumbling or the hinge screws no longer hold.
Some guides suggest sanding down the bulge and levelling it with wood filler. Such a repair improves the shape of the edge but does not restore the decor or the edging. Under the filler there also remains a board that has already soaked up water once.
How to prevent edge swelling
Wipe water off edges and joints at once. In its care recommendations for laminate worktops EGGER says to remove spilled liquids immediately, especially at cut-outs and joints. The manufacturer justifies this by the risk of a change in the laminate's gloss. We add a second reason ourselves, based on the EN 312 table: a P2 furniture board has no standard requirement for swelling. Under a washbasin, look regularly at the trap and hoses, and for cleaning choose the mild products from our YES/NO cheat sheet.
If you are replacing a cabinet under a washbasin, ask about the type of board for a bathroom through the contact form.
Scratch on veneer, dent and worn oil
Veneer is a thin layer of real wood on a board, so the repair depends on the finish. Oiled veneer can be refreshed locally with oil. Lacquered veneer is repaired much like laminate: with wax and touch-up lacquer. Heavy sanding risks wearing through the veneer in both cases.
| Problem | Oiled veneer (Oiled Oak, American Walnut) | Lacquered veneer |
|---|---|---|
| Worn, matt spot | cleaning, matting with a pad, oil, collecting the excess | touch-up lacquer, evening out the gloss with a pad |
| Shallow scratch on veneer | matting with a pad along the grain, and oil | wax rubbed in without melting, optionally lacquer |
| Deep scratch or dent | hard wax; ask the furniture manufacturer about lacquer over wax | clear or tinted hard wax and lacquer |
| Steam on a dent | not in the König instructions; choose wax | not in the König instructions; choose wax |
Oiled veneer: wear and light scratches
An oiled surface can be renewed without removing the whole coating, and the repaired spot can be blended into the rest of the top. In its instructions for renovating furniture with Oil Plus 2C Rubio Monocoat describes renovating oiled wood furniture. The instructions do not mention veneer, so we carry them over to veneer ourselves. The order is:
- Vacuum the surface, clean it with a care product and wait for it to dry.
- Matt the surface along the grain with a burgundy abrasive pad. The manufacturer writes that the pad corresponds roughly to paper of grit 320, and that for work by hand it is easier to use, because the pressure of your fingers is carried through thin paper onto the surface. On thin veneer this matters especially, in our view.
- Vacuum the dust, wipe with a damp cloth and wait for it to dry again.
- Apply the oil and leave it for at least 5 minutes.
- Remove all the excess with a dry cloth within 30 minutes.
- Leave the repaired spot to dry for about 24–36 hours, then rub it lightly with the pad so that it blends into the rest of the surface.
The instructions apply to this manufacturer's oil. For renovation use an oil that matches the one the furniture was finished with. If you do not know its name, ask the furniture manufacturer.
Lacquered veneer and dents
A dent in lacquered veneer is filled with clear hard wax. König describes its hard wax as a material for wood and decorative surfaces. In the instructions for repairing a dent, which do not specify the type of surface, it chooses clear wax (colour 900). It removes the excess with the sharp grooves of the applicator and degreases the spot with a grey pad. Finally it applies touch-up lacquer and after about 10–15 minutes evens out the gloss.
In the guides we looked at, steaming dents with a damp cloth and a hot iron comes up. The König instructions for dents do not include steam or water. Nor did we find a manufacturer's instruction that would recommend steaming furniture with oil or lacquer, so on such furniture choose wax.
When it is better to replace the part, and what about the guarantee
A part is worth replacing when the damage affects the structure and not just the looks. That is the case with a swollen board, a delaminated edge or screws that no longer hold. Furniture Lab furniture has a 24-month guarantee. If your furniture is younger, write to us first and only then reach for wax.
Consider replacement when:
- the board has swollen and after drying the edge is clearly thicker or the laminate is lifting;
- the edging has come off together with pieces of board;
- the loss is in the middle of a front and the wax would have to reproduce a large part of the decor pattern;
- hinges or runners do not hold in the board;
- the veneer is worn through to the board underneath.
Guarantee. Before you repair furniture that is less than 24 months old, send us a photo of the damage through the contact form. Decide whether to reach for wax only after you hear back.
A new part in the same decor. You set the size of our made-to-measure furniture in 1 cm steps, so a ready-made front from a DIY store will usually not fit. Whether the workshop will cut a single part in the same decor and size, ask us directly. Give the name of the furniture, the decor and the dimensions of the part, and attach a photo. The stages an order goes through are described in the Furniture Lab guide to production times.
Popular advice versus manufacturers' instructions
In the guides on repairing scratches and swollen board that we looked at while writing this article, four pieces of advice come up that are not in the manufacturers' instructions used above. We set them against the sources and add our own conclusion.
| Popular advice | What the sources say | Our conclusion |
|---|---|---|
| A scratch can be masked with walnut, coffee or vinegar with oil | The König instructions for scratches on wood and laminate rely on wax and touch-up lacquer. They give no home mixtures. | On furniture you care about, start with wax in the decor colour. |
| Swollen board can be saved with drying, glue and filler | According to the Wood Handbook, plywood, unlike most wood particle panels, swells irreversibly only minimally after soaking. EN 312 sets no swelling requirements for P2 furniture board. | Drying will stop the damage. If the laminate or edging has come away, plan to replace the part. |
| You can steam out a dent with a damp cloth and an iron | The König instructions for dents use neither steam nor water, only clear hard wax and lacquer. | On veneer with oil or lacquer, choose wax. |
| Damaged spots can simply be sanded with paper | The laminate pattern is paper with melamine resin (Kronospan). In its instructions for renovating oiled furniture Rubio Monocoat writes that for work by hand a burgundy pad (grit about 320) is easier to use than paper, because finger pressure is carried through thin paper onto the surface. | Do not sand laminate. On thin oiled veneer this matters especially, in our view: matt with a pad, along the grain. |
Frequently asked questions
What is the difference between soft wax and hard wax?
You rub soft wax into the scratch without melting and spread it with an applicator. Hard wax has to be melted with a melting tool; König gives a melting temperature of 81°C for its wax. You pour it in with a slight excess and level it with the applicator. Hard wax is meant for deep scratches, holes and edges.
Is a touch-up crayon enough for a scratch on laminated furniture?
It may be enough when the scratch is shallow and visible mainly as a pale colour. Check on the packaging whether the crayon only tints or also fills the scratch. For a scratch that a fingernail catches on, hard wax is the better choice.
Can swollen furniture board be dried and pressed flat?
It can be dried, but the original thickness usually will not return. The Wood Handbook notes that, unlike plywood, most wood particle panels swell partly irreversibly after soaking. Drying stops further damage. When the laminate or edging has come away, you usually have to replace the part.
Can a dent in veneer be steamed out?
On furniture with oil or lacquer, better not. The König instructions for dents do not include steam or water, and we found no manufacturer that recommends it. Fill the dent with clear hard wax and protect it with touch-up lacquer.
How do I match the wax colour to the decor?
Prepare several shades, from light to dark, and mix them in the melting tool until the colour comes close to the decor. Draw the grain with a darker wax. First test on an inconspicuous spot, for example on the back edge of a side panel.
How do I repair a scratch on a high-gloss front?
König paints a light scratch on high gloss with clear lacquer from a pen and after about 2 hours polishes it lightly with fine paste on a felt pad. Be careful with paste on laminate: EGGER warns that abrasive agents can change the gloss and scratch the surface.
Summary: repair or replace
If you are looking for an answer to how to repair a scratch on laminated furniture, start with the fingernail test. You mask a shallow scratch with soft wax, and you fill a deep scratch or a chip with hard wax under lacquer. You glue edging back with an iron or contact adhesive if the board under it is dry. Swollen board usually cannot be reversed, so replacing the part is often the better way out there. If in doubt, go back to the decision diagram.
Do you have furniture from us and are unsure what to choose? Write to us and attach a photo of the damage. If you are planning new furniture, see the furniture in our shop: production within 10 working days, free courier delivery and a 24-month guarantee. You will find more tips in the Furniture care category.
How this guide was made. We describe the steps for repairing scratches, chips, edging and veneer according to the instructions of the makers of repair kits, boards, edgings and oils, the EN 312 standard and the Wood Handbook. The diagram, the diagnosis card, the illustrations, the decision tables and the standard conversion are our own. We did not test these methods for this article. Sources as of 16 September 2026.
Sources:
- Kronospan, Melamine faced particleboard (MF PB)
- König (Picobello), repair instructions: light scratches, scratches on wood and laminate, worktop edge, dent, scratches on high gloss; product page Hard Wax Filler
- Flexible Materials (Flexwood), Pre-Glued Wood Veneer Edgebanding Application Instructions
- EN 312:2010 Particleboards. Specifications, standard sample (SIST EN 312:2011)
- Stark N. M., Cai Z., Carll C., Wood-Based Composite Materials, in: Wood Handbook, FPL-GTR-190, USDA Forest Products Laboratory, 2010, ch. 11
- EGGER, How should I clean and maintain my EGGER Worktop?
- EGGER, Cleaning and care recommendations for EGGER product surfaces, rev. 02, 31.10.2024, PDF copy provided by a distributor
- Rubio Monocoat, How to renovate furniture with Oil Plus 2C
Furniture for your wall, to the centimetre
See what you can design to measure, or go to the recommended page.
Read next
 Furniture care
How to clean laminate and veneer furniture
How to clean laminate and veneer furniture? A YES/NO table for 12 household products, based on EGGER, Kronospan and oil makers. Check before you wash a front.
23 min read
 Advice
How to choose furniture colour: sample test
How to choose furniture colour when a screen and a bulb alter a decor's shade? Test a sample at home in 9 steps: light, floor, upright and flat. PDF checklist.
27 min read
 Do it yourself
How to hang a wall cabinet on any wall type
How to hang a wall cabinet on plasterboard, hollow block or concrete? Check the wall plug load capacity in fischer tables, work out the load and fit it.
34 min read